


Crazy Monster Build thread

Thread Starter
|
Road Captain

Joined: Sep 2012
Posts: 666
Likes: 25
From: Ct
Holy crapper, the 600 arm showed up today!!!!
I ordered it from New Jersey, $50.00 delivered!!!!! Shock, axle and spacers on the way.
Anyway, it slots right into the friggin frame!!!! Just gonna have to have a pivot bolt, some spacers and two bushings made. Or I could just drill out the frame and not have to make bushings, either way. The cost of a drill bit that large would probably be the same cost as the bushings anyway.The chain line with this arm looks to only be off by a half inch!!!!!!!!
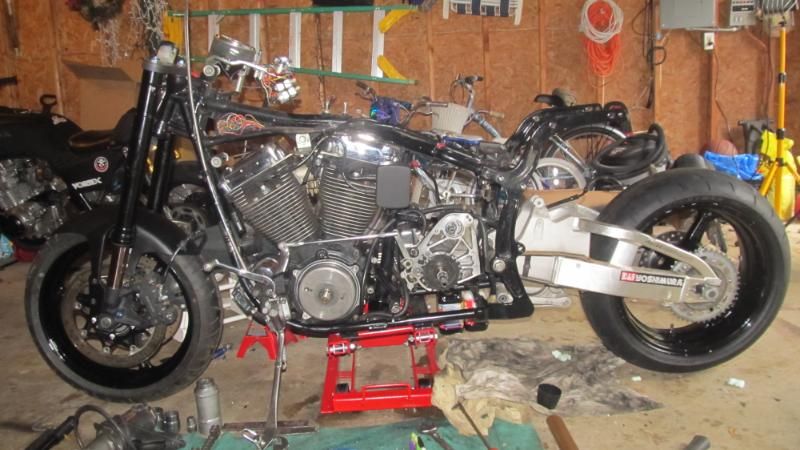

And hey, I know the bike has a sporty type of stance in these pics, but it is just a mock up. Will look way different in final form, TRUST ME!!!
No, that is not a steam roller in the background, that is my 750F!!!
I ordered it from New Jersey, $50.00 delivered!!!!! Shock, axle and spacers on the way.
Anyway, it slots right into the friggin frame!!!! Just gonna have to have a pivot bolt, some spacers and two bushings made. Or I could just drill out the frame and not have to make bushings, either way. The cost of a drill bit that large would probably be the same cost as the bushings anyway.The chain line with this arm looks to only be off by a half inch!!!!!!!!
And hey, I know the bike has a sporty type of stance in these pics, but it is just a mock up. Will look way different in final form, TRUST ME!!!
No, that is not a steam roller in the background, that is my 750F!!!
Last edited by ctluba; Sep 26, 2012 at 06:35 PM.

Advanced
Joined: Feb 2011
Posts: 91
Likes: 0
From: Louisville, KY
If you haven't figured out those plug ends yet take pictures and post them. If they are molex connectors they come apart real easy. Just remember which wire goes where. Look inside the plug ther should be two holes in the center that you can put a small pair of needle nose plier tip in. Insert squeeze slightly and pull up. It won't come all the way out. It just unlocks the plug. Then there should be small pin holes next to each wire. Insert a small drill bit or stiff wire till you feel a slight click and pull the wire from the opposite side and it will slide right out.
Thread Starter
|
Road Captain
Joined: Sep 2012
Posts: 666
Likes: 25
From: Ct
Thread Starter
|
Road Captain
Joined: Sep 2012
Posts: 666
Likes: 25
From: Ct
If you haven't figured out those plug ends yet take pictures and post them. If they are molex connectors they come apart real easy. Just remember which wire goes where. Look inside the plug ther should be two holes in the center that you can put a small pair of needle nose plier tip in. Insert squeeze slightly and pull up. It won't come all the way out. It just unlocks the plug. Then there should be small pin holes next to each wire. Insert a small drill bit or stiff wire till you feel a slight click and pull the wire from the opposite side and it will slide right out.
HD Forum Stories
The Best of Harley-Davidson for Lifelong Riders

7 Surprising Harley-Davidson Products that Are Not Motorcycles
Verdad Gallardo
8 Best Harley-Davidson Motorcycles Ever
Pouria Savadkouei
10 Worst Harley-Davidson Motorcycles Ever
Pouria Savadkouei
Killer Custom's Jail Break Is The Breakout That Refused to Blend In
Verdad Gallardo
Crazy Bunderbike Build Looks Amazing, But Is It Impossible to Ride?
Verdad Gallardo
Harley-Davidson Reveals Super Cool Cafe Racer Concept
Verdad Gallardo
Engraved Rebellion: Inside Bundnerbike's Glam Rock II
Verdad Gallardo
10 Motorcycles You Should Never Buy
Joe Kucinski
10 Things Harley-Davidson Needs to Fix in 2026
Verdad Gallardo
Thread Starter
|
Road Captain
Joined: Sep 2012
Posts: 666
Likes: 25
From: Ct
I will just be happy if everything goes smooth from here on out. Issues have a way of poppin up!!!!!
I am concerned with the fork clearance to the tank and a few other things. We will see, I will keep the updates comin. Hopin to have the stem swap done this weekend or early next week, then I will feel a little better gettin the front end squared away. I can then focus on the rear end.
This is why I chose the CBR swinger. All that is required is making a bottom shackle for the shock linkage. No upper shock mount to build, since it is all part of the swinger. Really helped me fast track this project. If I went with a regular swinger I would definately have to have a welder design all the mounts. My brother is good enough to build and weld up a shackle. I just plan to over-build it due to how heavy harleys are. This photo is an example of really well built shakle. Guy boxed in the whole bottom frame tube.
Last edited by ctluba; Sep 26, 2012 at 09:09 PM.