








"DIY MODS" and TRICKS to SAVE $$$$$$

Novice
Joined: Mar 2011
Posts: 23
Likes: 12
From: Salt Lake City, UT
 Alternative to $30 Reda Gas Can
I found a one-gallon gas can at my local hardware store that was 100 percent fume proof and leak proof. Fits my hard bags just fine. Price? $6. Sure beats that overpriced $30 one from Reda.

Intermediate
Joined: Jun 2009
Posts: 36
Likes: 1
Painless Fork Oil Change
After seeing this idea online, I decided to give it a try. I've been wanting to change the Road King's fork oil to the SE Heavy for a while.
So here's how I did it. Again not my original idea but happy to share my experience with this group. Using an 8mmx1.25 x 1.5" long bolt and a couple of nuts. I cut off the head of the bolt and drilled through it with a 1/8" bit. I double nutted the headless bolt in the middle so that it could be installed in the fork drain hole. I forced a 1/4" ID clear plastic tube over the other end of the bolt with some RTV to make it air tight. This tube is about 18" long.
Step 1 - Raise the front wheel and remove the drain screw and let the fork drain.
Step 2 - install the 8mm bolt with a small o-ring to make an air tight fit in the drain hole. Snug in place using the jammed nuts to tighten.
Step 3 - lower the front wheel and adapt the other end of the tube to a vacuum source ( I used my mity vac and was able to pull 22 inches of mercury).
Step 4 - raise the front wheel again (this provides a bit more vacuum as the fork extends)
Step 5 - Using vise grips, clamp over the tube a few inches away from the fork to trap the vacuum, remove the tube end from the vacuum source and put it in the container of premeasured new fork oil of your choice.
Step 6 - While keeping the end of the tube submerged in the new oil, release the vise grips and watch the oil disappear into the fork.
Step 7 - When all the oil in sucked in, clamp the tube again with the vise grips and remove the 8mm bolt and attached tube and quickly install the drain screw.
Step 8 - Repeat above steps for other fork tube.
I thought I might lose a bit of oil when replaceing the drain screw but there was still vacuum in the fork and no oil was lost. Maybe a table spoon of oil was left in the container and the plastic tube.
Total time was from start to finish including drilling the bolt was 60 minutes. Next time I would expect to be able to complete both sides in 30 minutes start to finish.
So here's how I did it. Again not my original idea but happy to share my experience with this group. Using an 8mmx1.25 x 1.5" long bolt and a couple of nuts. I cut off the head of the bolt and drilled through it with a 1/8" bit. I double nutted the headless bolt in the middle so that it could be installed in the fork drain hole. I forced a 1/4" ID clear plastic tube over the other end of the bolt with some RTV to make it air tight. This tube is about 18" long.
Step 1 - Raise the front wheel and remove the drain screw and let the fork drain.
Step 2 - install the 8mm bolt with a small o-ring to make an air tight fit in the drain hole. Snug in place using the jammed nuts to tighten.
Step 3 - lower the front wheel and adapt the other end of the tube to a vacuum source ( I used my mity vac and was able to pull 22 inches of mercury).
Step 4 - raise the front wheel again (this provides a bit more vacuum as the fork extends)
Step 5 - Using vise grips, clamp over the tube a few inches away from the fork to trap the vacuum, remove the tube end from the vacuum source and put it in the container of premeasured new fork oil of your choice.
Step 6 - While keeping the end of the tube submerged in the new oil, release the vise grips and watch the oil disappear into the fork.
Step 7 - When all the oil in sucked in, clamp the tube again with the vise grips and remove the 8mm bolt and attached tube and quickly install the drain screw.
Step 8 - Repeat above steps for other fork tube.
I thought I might lose a bit of oil when replaceing the drain screw but there was still vacuum in the fork and no oil was lost. Maybe a table spoon of oil was left in the container and the plastic tube.
Total time was from start to finish including drilling the bolt was 60 minutes. Next time I would expect to be able to complete both sides in 30 minutes start to finish.
Novice
Joined: Apr 2011
Posts: 20
Likes: 0
From: Hartford, KY
Read this thread- it's very interesting and will likely save you a bundle of money... 
https://www.hdforums.com/m_2836828/tm.htm
https://www.hdforums.com/m_2836828/tm.htm

Stage I
Joined: May 2011
Posts: 1
Likes: 0
From: New Jersey
Hi All, Just joined the forum and have no idea how things work so please be patient if I screw up. I have a 2011 FLHTP that I picked up 6 weeks ago and after many years of riding I got fed up with being tail gated down the road. Almost got rear ended 4 weeks ago so I picked up on ebay a Police radio box, power unit and 2 strobe lights and made up a bracket for the rear of the bike . After mounting the lights and box, I wired the power supply with a relay to my brake lights and "WHALAH"... strobes go on when I brake. Got it done last week and when I hit the brakes, they all back away. Don't know if it is legal, but it should be a standard on ALL bikes.

Cruiser
Joined: Jul 2010
Posts: 206
Likes: 1
Garage door opener - Redneck repairs version
It's been a rainy weekend where I am, so I decided to take the time to solve a pesky problem with my garage door opener. I had been carrying it in the left side lower fairing pocket on my FLHTCUI, but it was just rattling around in there, and I would have to put the bike in neutral or kill the engine to free up my left hand to reach in and push the button. I decided to semi-permanently mount it with an external button.
I started off by taking my old Sears door opener apart and removing the original micro-motion switches from the circuit board, soldering a couple of short wires to the contact points for the desired door, and mounting a 1/8 inch audio jack in the case. I also assembled a cable consisting of a 1/8 inch audio plug, about 1 foot of wire and a pushbutton (momentary spst) that would plug into the jack in the opener case.
Here's what the reassembled opener looks like with the cable attached:

I drilled a 3/8 inch hole under the little flap at the bottom of the pocket cover and installed the switch and wire:

I tried mounting the opener with double sided tape and velcro, but because the inside of the pocket does not have any flat spots, it bacame apparent that it would not stay stuck sooooo..... I wrapped the opener up in some "egg-crate" style foam rubber pieces and stuffed it neatly into the pocket:


After putting the cover back on the pocket, the button is covered and somewhat protected from the elements. It's in the perfect position that a gentle nudge with my toe opens the door without having to take my hands off of the bars. I may upgrade the button to a heavier model, but for now I have a good workable solution to a minor headache. Except for the opener, the total cost was about $5.00 for parts from the local Radio Shack store.


I started off by taking my old Sears door opener apart and removing the original micro-motion switches from the circuit board, soldering a couple of short wires to the contact points for the desired door, and mounting a 1/8 inch audio jack in the case. I also assembled a cable consisting of a 1/8 inch audio plug, about 1 foot of wire and a pushbutton (momentary spst) that would plug into the jack in the opener case.
Here's what the reassembled opener looks like with the cable attached:
I drilled a 3/8 inch hole under the little flap at the bottom of the pocket cover and installed the switch and wire:
I tried mounting the opener with double sided tape and velcro, but because the inside of the pocket does not have any flat spots, it bacame apparent that it would not stay stuck sooooo..... I wrapped the opener up in some "egg-crate" style foam rubber pieces and stuffed it neatly into the pocket:
After putting the cover back on the pocket, the button is covered and somewhat protected from the elements. It's in the perfect position that a gentle nudge with my toe opens the door without having to take my hands off of the bars. I may upgrade the button to a heavier model, but for now I have a good workable solution to a minor headache. Except for the opener, the total cost was about $5.00 for parts from the local Radio Shack store.
Reflectors
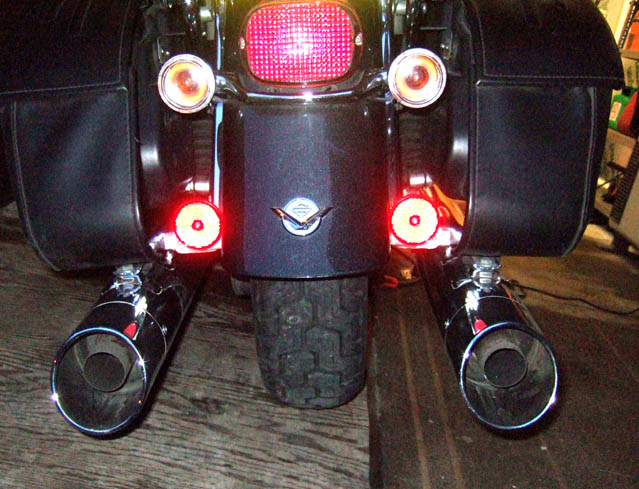
When fitting a lay back number plate the rear reflector was junked. Reflector needed for government yearly road worthiness test (MOT) so two neat round ones fitted (3/16" stainless UNC) on small brackets to fender/pannier/muffler brackets. Cover up ugly bolts and bracketry, and match indicators and muffler end roundness.
.
.
Last edited by IanEd; May 19, 2011 at 09:18 AM.
HD Forum Stories
The Best of Harley-Davidson for Lifelong Riders

7 Surprising Harley-Davidson Products that Are Not Motorcycles
Verdad Gallardo
8 Best Harley-Davidson Motorcycles Ever
Pouria Savadkouei
10 Worst Harley-Davidson Motorcycles Ever
Pouria Savadkouei
Killer Custom's Jail Break Is The Breakout That Refused to Blend In
Verdad Gallardo
Crazy Bunderbike Build Looks Amazing, But Is It Impossible to Ride?
Verdad Gallardo
Harley-Davidson Reveals Super Cool Cafe Racer Concept
Verdad Gallardo
Engraved Rebellion: Inside Bundnerbike's Glam Rock II
Verdad Gallardo
10 Motorcycles You Should Never Buy
Joe Kucinski
10 Things Harley-Davidson Needs to Fix in 2026
Verdad Gallardo
Novice
Joined: Oct 2008
Posts: 21
Likes: 0
From: Minnesota
garage door opener
I can't believe that almost 2 years ago I wrote one of the very first garage door opener mod's on this site. It's amazing how many have posted since then, but I agree, maybe we should move on!!
Extreme HDF Member
Joined: Apr 2006
Posts: 10,449
Likes: 46
From: Roswell, GA
I relocated the rider headset connector used for the CB/Intercom from the gas tank in front of the seat (which is what's provided in the Boom Audio Music and Intercom kit, p/n 77108-09) to the left side mid-frame air deflector (installed deflector kit just for this purpose; kit is p/n 58022-07A). In it's new location, it very inconspicuous, but functional.
Those who don't like the location of the rider headset connector on their Ultras may be interested in doing this mod.
Carl
Those who don't like the location of the rider headset connector on their Ultras may be interested in doing this mod.
Carl