






Legend Suspension Aero Air System
Thread Starter
|
Cruiser
Joined: Jun 2011
Posts: 200
Likes: 8
From: Cleveland, Ohio
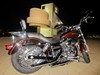
 Legend Suspension Aero Air System
Two years ago I purchased a pair of Legend Suspension Air Ride for my 2011 FXDC. The ride quality was impeccable and a major upgrade from the stock setup. Recently I heard about the new version of Legend Suspension named Aero. Being that I enjoyed the first set so much I have decided to purchase the newest version for my bike. So below I will detail my thoughts on this system and the install.
Here is the package as it arrived.
All the items were neatly and snugly packaged for shipping. Included in the box was everything needed for install as well as a tube cutter. This is actually very important so that you can cut the tube squarely.
The instructions were well layed out and very easy to follow (TGFT).
The first step is the install of the handlebar switch. There is a inflate and deflate button, 2 buttons. I choose the chrome option for my switch. Though I believe the standard is black. The switch replaces, well I am not sure actually since I had the black switch in place from the first system I had installed. But it uses the stock hardware to mount the switch to the left of the clutch perch.
I used the stock wire hangers on the handlebar to run the wire down to the gas tank. I then ran the wire underneath the gas tank to the compartment under my seat.
I then removed the battery and the battery box. The first time around I did not remove the battery box and tried to just snake the wires around underneath the seat, and I will say that took me an extra hour or two last time. Removing the battery box was a heck of a lot easier.
The compressor installs on the right side where the forward control mounts in the frame are. I have mid controls so there were 2 plugs that had to be removed and the mounting bracket for the compressor installs there. Solid steel bracket with black anodizing. Then the compressor fits between the motor and the frame at the very bottom and behind the down tubes. Install was easy for me. 2 bolts for the bracket, 3 bolts for the compressor to bracket and was done. Then time to run wiring from under the seat to the compressor as well as run the air hose to the rear. I followed the direction's recommendation of snaking under the frame and running up the tubes underneath the seat. Making sure of course there will not be any rubbing of the wires or hose during normal operation of the rear brake or the motorcycle in general.
Then it's time to jack up the bike and remove the old suspension ONE AT A TIME. Which is a fairly easy affair. I of course used Loctite where needed during the install of all parts.
Once the shocks are installed and the air lines are connected to the new suspension. That's it.
It was a fairly easy install that was not complicated at all.
I am very pleased with the new system and have also took the wife out to Mother's Day dinner on it. I live in Cleveland Ohio and after the log *** winter we had, the roads are twice as bad as normal. So having the air ride is a necessity for me. The wife is pleased as me too. She would not ride as long or as often before I bought the first system and a lot of the reason I even looked at air ride initially. I will update this post with a few more picture still and more info on ride quality after spending some more time in the saddle with the new ones.
Here is the package as it arrived.
All the items were neatly and snugly packaged for shipping. Included in the box was everything needed for install as well as a tube cutter. This is actually very important so that you can cut the tube squarely.
The instructions were well layed out and very easy to follow (TGFT).
The first step is the install of the handlebar switch. There is a inflate and deflate button, 2 buttons. I choose the chrome option for my switch. Though I believe the standard is black. The switch replaces, well I am not sure actually since I had the black switch in place from the first system I had installed. But it uses the stock hardware to mount the switch to the left of the clutch perch.
I used the stock wire hangers on the handlebar to run the wire down to the gas tank. I then ran the wire underneath the gas tank to the compartment under my seat.
I then removed the battery and the battery box. The first time around I did not remove the battery box and tried to just snake the wires around underneath the seat, and I will say that took me an extra hour or two last time. Removing the battery box was a heck of a lot easier.
The compressor installs on the right side where the forward control mounts in the frame are. I have mid controls so there were 2 plugs that had to be removed and the mounting bracket for the compressor installs there. Solid steel bracket with black anodizing. Then the compressor fits between the motor and the frame at the very bottom and behind the down tubes. Install was easy for me. 2 bolts for the bracket, 3 bolts for the compressor to bracket and was done. Then time to run wiring from under the seat to the compressor as well as run the air hose to the rear. I followed the direction's recommendation of snaking under the frame and running up the tubes underneath the seat. Making sure of course there will not be any rubbing of the wires or hose during normal operation of the rear brake or the motorcycle in general.
Then it's time to jack up the bike and remove the old suspension ONE AT A TIME. Which is a fairly easy affair. I of course used Loctite where needed during the install of all parts.
Once the shocks are installed and the air lines are connected to the new suspension. That's it.
It was a fairly easy install that was not complicated at all.
I am very pleased with the new system and have also took the wife out to Mother's Day dinner on it. I live in Cleveland Ohio and after the log *** winter we had, the roads are twice as bad as normal. So having the air ride is a necessity for me. The wife is pleased as me too. She would not ride as long or as often before I bought the first system and a lot of the reason I even looked at air ride initially. I will update this post with a few more picture still and more info on ride quality after spending some more time in the saddle with the new ones.
Thread Starter
|
Cruiser
Joined: Jun 2011
Posts: 200
Likes: 8
From: Cleveland, Ohio
Tall Timber: The new version does give more adjustability. You can set the height as you wish and the shock self adjusts to rider weight and road conditions allowing full wheel travel. I really am liking the ability to ride low and still have plenty of wheel travel. I have a hard time setting the bike the same height each time since the rebound is there no matter the height you set.
Thread Starter
|
Cruiser
Joined: Jun 2011
Posts: 200
Likes: 8
From: Cleveland, Ohio
I have had some good saddle time with the set. I am very satisfied!
With the original air suspension, it was not that good of a ride at a very low setting, it easily bottomed out. The bike was similar to a hardtail when all the way down, and I mean all the way down. This new set sits a little higher in the lowest setting by maybe an inch or so (or so it seems). The ridability at low settings now has definitely improved with the new design-technology. The shocks feel like springs and air shocks now. The bumps are handled even better than before. Like when hitting bumps now there seems to be a little more of a recoil before settling to a floating state which feels even better. Lean angles at low settings has greatly improved and to me seems to be the most noticeable change.
Ridability is there throughout the adjustment of pressure. I can see this being a great option for the shorter riders so that they could ride low and still have proper dampening and compression along with confidence. They could lower the bike to mount and then ride it low comfortably as well.
I still prefer to ride my bike with the most air for my setup. I think I may need to purchase their air pressure gauge so that I play with minor changes in air pressure, but currently I set it by alignment of my exhaust to the swingarm and bump up the air from there as needed if I feel any bumps at all.
Overall the I am still extremely happy with Legend's air ride technology. By far the best looking and the best functioning air suspension option out there. I have seen other systems out there and even seen the ones being "modified" to work on someone's bike. I do not mind paying some extra coin considering how effing much my bike cost in the first place. When your life is at stake do you want to cut costs and take shortcuts? Not I, so with the known safe and secure technology that Legend Suspension uses why consider anything less? I would never put a "$100" air ride that I modified to work on my bike and hope it keeps my multi-thousand dollar bike and my priceless life safe? With Legend I know that if one or both of the bags were to fail or I lost all air I still could ride the bike safely back home. Not that in the two years I have been riding with Legend's air ride have I had even one issue.
One thing I would like to add about air ride versus coil over, my wrists goes numb and not my rear end.
With the original air suspension, it was not that good of a ride at a very low setting, it easily bottomed out. The bike was similar to a hardtail when all the way down, and I mean all the way down. This new set sits a little higher in the lowest setting by maybe an inch or so (or so it seems). The ridability at low settings now has definitely improved with the new design-technology. The shocks feel like springs and air shocks now. The bumps are handled even better than before. Like when hitting bumps now there seems to be a little more of a recoil before settling to a floating state which feels even better. Lean angles at low settings has greatly improved and to me seems to be the most noticeable change.
Ridability is there throughout the adjustment of pressure. I can see this being a great option for the shorter riders so that they could ride low and still have proper dampening and compression along with confidence. They could lower the bike to mount and then ride it low comfortably as well.
I still prefer to ride my bike with the most air for my setup. I think I may need to purchase their air pressure gauge so that I play with minor changes in air pressure, but currently I set it by alignment of my exhaust to the swingarm and bump up the air from there as needed if I feel any bumps at all.
Overall the I am still extremely happy with Legend's air ride technology. By far the best looking and the best functioning air suspension option out there. I have seen other systems out there and even seen the ones being "modified" to work on someone's bike. I do not mind paying some extra coin considering how effing much my bike cost in the first place. When your life is at stake do you want to cut costs and take shortcuts? Not I, so with the known safe and secure technology that Legend Suspension uses why consider anything less? I would never put a "$100" air ride that I modified to work on my bike and hope it keeps my multi-thousand dollar bike and my priceless life safe? With Legend I know that if one or both of the bags were to fail or I lost all air I still could ride the bike safely back home. Not that in the two years I have been riding with Legend's air ride have I had even one issue.
One thing I would like to add about air ride versus coil over, my wrists goes numb and not my rear end.
Nice write up. I too love my aero setup. Huge improvement over stock and their lifetime warranty no questions ask policy on their product.
Trending Topics

1st Gear
Joined: Mar 2022
Posts: 5
Likes: 0
From: Royal oak MI
Help with legend air ride
[QUOTE=jangler14;12712740]Two years ago I purchased a pair of Legend Suspension Air Ride for my 2011 FXDC. The ride quality was impeccable and a major upgrade from the stock setup. Recently I heard about the new version of Legend Suspension named Aero. Being that I enjoyed the first set so much I have decided to purchase the newest version for my bike. So below I will detail my thoughts on this system and the install.
Here is the package as it arrived.
All the items were neatly and snugly packaged for shipping. Included in the box was everything needed for install as well as a tube cutter. This is actually very important so that you can cut the tube squarely.
The instructions were well layed out and very easy to follow (TGFT).
The first step is the install of the handlebar switch. There is a inflate and deflate button, 2 buttons. I choose the chrome option for my switch. Though I believe the standard is black. The switch replaces, well I am not sure actually since I had the black switch in place from the first system I had installed. But it uses the stock hardware to mount the switch to the left of the clutch perch.
I used the stock wire hangers on the handlebar to run the wire down to the gas tank. I then ran the wire underneath the gas tank to the compartment under my seat.
I then removed the battery and the battery box. The first time around I did not remove the battery box and tried to just snake the wires around underneath the seat, and I will say that took me an extra hour or two last time. Removing the battery box was a heck of a lot easier.
The compressor installs on the right side where the forward control mounts in the frame are. I have mid controls so there were 2 plugs that had to be removed and the mounting bracket for the compressor installs there. Solid steel bracket with black anodizing. Then the compressor fits between the motor and the frame at the very bottom and behind the down tubes. Install was easy for me. 2 bolts for the bracket, 3 bolts for the compressor to bracket and was done. Then time to run wiring from under the seat to the compressor as well as run the air hose to the rear. I followed the direction's recommendation of snaking under the frame and running up the tubes underneath the seat. Making sure of course there will not be any rubbing of the wires or hose during normal operation of the rear brake or the motorcycle in general.
Then it's time to jack up the bike and remove the old suspension ONE AT A TIME. Which is a fairly easy affair. I of course used Loctite where needed during the install of all parts.
Once the shocks are installed and the air lines are connected to the new suspension. That's it.
It was a fairly easy install that was not complicated at all.
I am very pleased with the new system and have also took the wife out to Mother's Day dinner on it. I live in Cleveland Ohio and after the log *** winter we had, the roads are twice as bad as normal. So having the air ride is a necessity for
Here is the package as it arrived.
All the items were neatly and snugly packaged for shipping. Included in the box was everything needed for install as well as a tube cutter. This is actually very important so that you can cut the tube squarely.
The instructions were well layed out and very easy to follow (TGFT).
The first step is the install of the handlebar switch. There is a inflate and deflate button, 2 buttons. I choose the chrome option for my switch. Though I believe the standard is black. The switch replaces, well I am not sure actually since I had the black switch in place from the first system I had installed. But it uses the stock hardware to mount the switch to the left of the clutch perch.
I used the stock wire hangers on the handlebar to run the wire down to the gas tank. I then ran the wire underneath the gas tank to the compartment under my seat.
I then removed the battery and the battery box. The first time around I did not remove the battery box and tried to just snake the wires around underneath the seat, and I will say that took me an extra hour or two last time. Removing the battery box was a heck of a lot easier.
The compressor installs on the right side where the forward control mounts in the frame are. I have mid controls so there were 2 plugs that had to be removed and the mounting bracket for the compressor installs there. Solid steel bracket with black anodizing. Then the compressor fits between the motor and the frame at the very bottom and behind the down tubes. Install was easy for me. 2 bolts for the bracket, 3 bolts for the compressor to bracket and was done. Then time to run wiring from under the seat to the compressor as well as run the air hose to the rear. I followed the direction's recommendation of snaking under the frame and running up the tubes underneath the seat. Making sure of course there will not be any rubbing of the wires or hose during normal operation of the rear brake or the motorcycle in general.
Then it's time to jack up the bike and remove the old suspension ONE AT A TIME. Which is a fairly easy affair. I of course used Loctite where needed during the install of all parts.
Once the shocks are installed and the air lines are connected to the new suspension. That's it.
It was a fairly easy install that was not complicated at all.
I am very pleased with the new system and have also took the wife out to Mother's Day dinner on it. I live in Cleveland Ohio and after the log *** winter we had, the roads are twice as bad as normal. So having the air ride is a necessity for
HD Forum Stories
The Best of Harley-Davidson for Lifelong Riders

7 Surprising Harley-Davidson Products that Are Not Motorcycles
Verdad Gallardo
8 Best Harley-Davidson Motorcycles Ever
Pouria Savadkouei
10 Worst Harley-Davidson Motorcycles Ever
Pouria Savadkouei
Killer Custom's Jail Break Is The Breakout That Refused to Blend In
Verdad Gallardo
Crazy Bunderbike Build Looks Amazing, But Is It Impossible to Ride?
Verdad Gallardo
Harley-Davidson Reveals Super Cool Cafe Racer Concept
Verdad Gallardo
Engraved Rebellion: Inside Bundnerbike's Glam Rock II
Verdad Gallardo
10 Motorcycles You Should Never Buy
Joe Kucinski
10 Things Harley-Davidson Needs to Fix in 2026
Verdad Gallardo
Thread
Thread Starter
Forum
Replies
Last Post