


M8 Cam Install Step by Step **UPDATED w/New Images**
We put together an updated Cam Installation article for H-D Milwaukee Eight engine, the previous thread we posted back in 2016 no longer has images due to a server hosting issue. The full article can also be found on the Fuel Moto University site along with other technical write ups.
In this article we will outline what is involved in a cam swap in the H-D Milwaukee Eight engine. This is a very straight forward procedure. We will be covering the complete step by step install using a bolt in replacement cam using quick install adjustable pushrods, in this example we will be re-using the stock lifters. The bike is a Road Glide with 107" M8 air cooled engine.
Here is the motor ready for disassembly, we've removed the complete exhaust system, air cleaner, and cam cover.

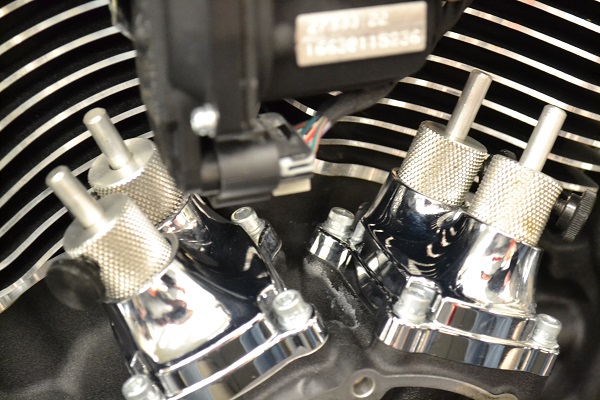
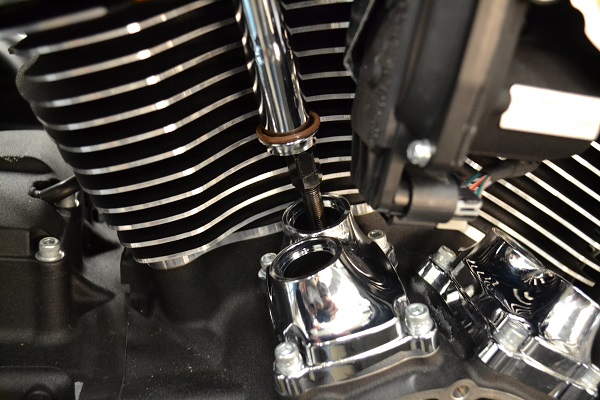
In this application we will not be re-using the factory pushrods, we are using Quick Install style adjustable pushrods. THe image below shows cutting the factory pushrods with a bolt cutters and removing them. Do not use a cutoff wheel or grinder, use a bolt cutter which makes a clean cut and eliminates (or highly reduces) the chances of any particulates making their way into the motor.

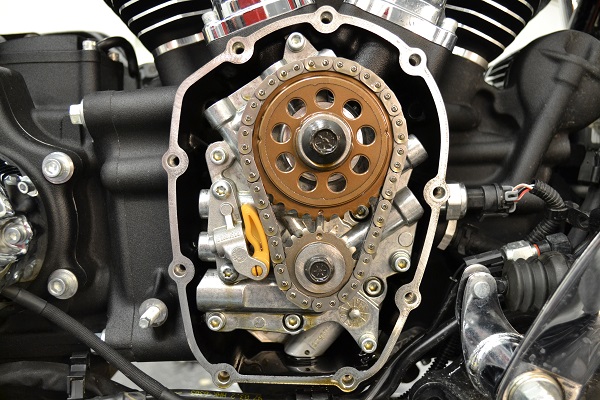
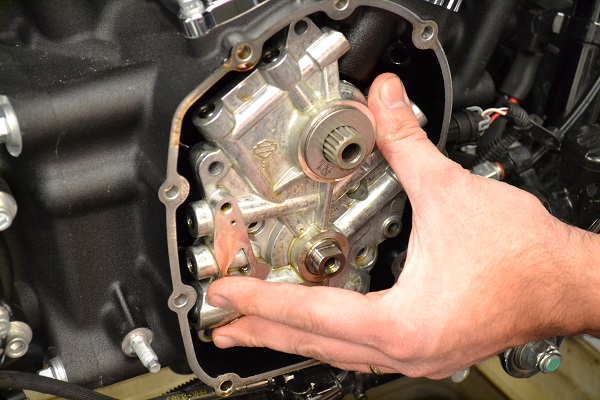
Remove the cam cover. Here is a close up image of the camchest. Next remove the cam chain tensioner, sprockets & chain, then completely remove the cam plate leaving the oil pump in place in the engine case.
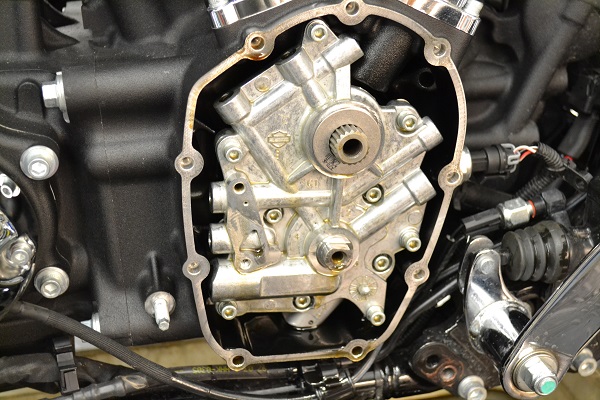
camchest with cam plate removed

In this article we will outline what is involved in a cam swap in the H-D Milwaukee Eight engine. This is a very straight forward procedure. We will be covering the complete step by step install using a bolt in replacement cam using quick install adjustable pushrods, in this example we will be re-using the stock lifters. The bike is a Road Glide with 107" M8 air cooled engine.
Here is the motor ready for disassembly, we've removed the complete exhaust system, air cleaner, and cam cover.
In this application we will not be re-using the factory pushrods, we are using Quick Install style adjustable pushrods. THe image below shows cutting the factory pushrods with a bolt cutters and removing them. Do not use a cutoff wheel or grinder, use a bolt cutter which makes a clean cut and eliminates (or highly reduces) the chances of any particulates making their way into the motor.
Remove the cam cover. Here is a close up image of the camchest. Next remove the cam chain tensioner, sprockets & chain, then completely remove the cam plate leaving the oil pump in place in the engine case.
camchest with cam plate removed
__________________

Jamie Long / Fuel Moto USA
The USA's Leader V-Twin EFI & Performance www.fuelmotousa.com
Contact 920-423-3309
Email jamie@fuelmotousa.com
Jamie Long / Fuel Moto USA
The USA's Leader V-Twin EFI & Performance www.fuelmotousa.com
Contact 920-423-3309
Email jamie@fuelmotousa.com
Removal and installation of the the inner cam bearing using the appropriate cam bearing tools


M8 cam plate removed from engine

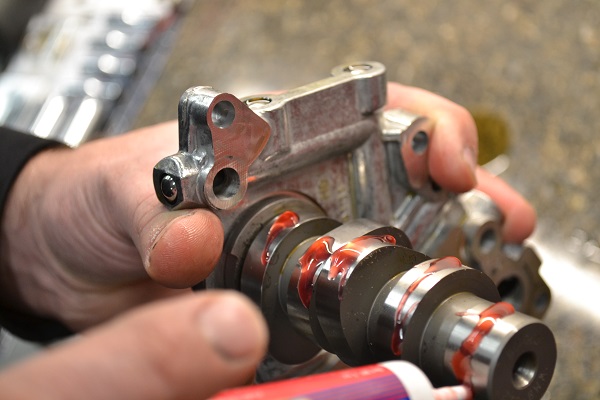
backside view of M8 cam plate with camshaft

M8 cam plate removed from engine
backside view of M8 cam plate with camshaft
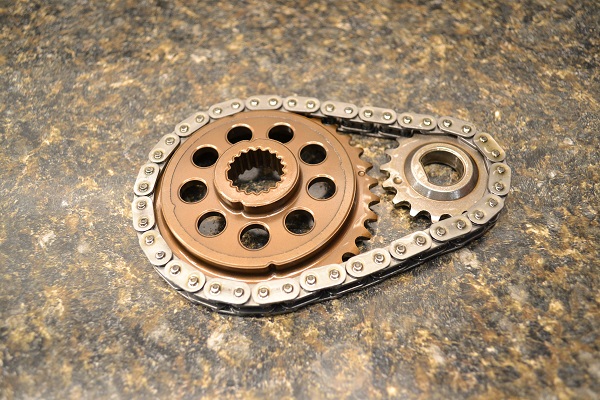
Cam sprockets & chain
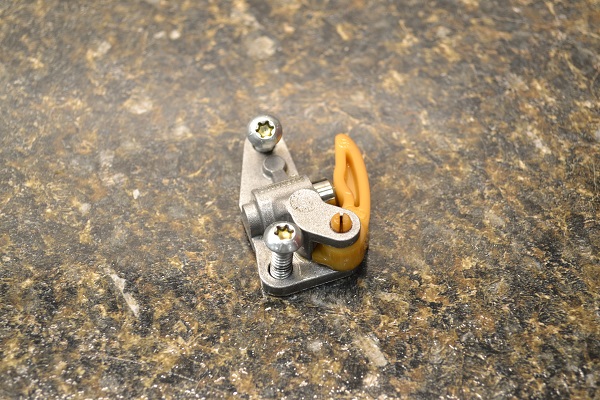
cam chain tensioner
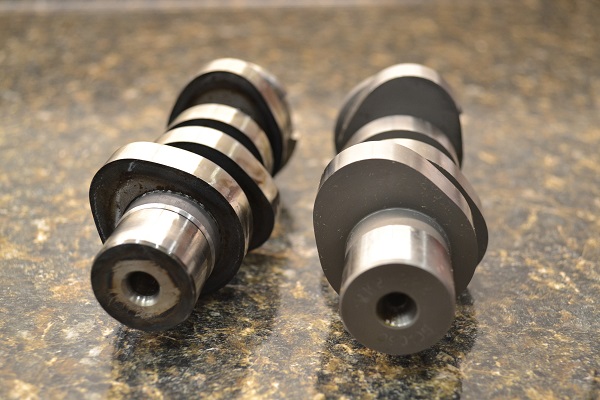
stock H-D M8 cam on the left, Wood Performance WM8-222 cam on the right. Note the lobes are pressed on the factory cam, the aftermarket cam is machined from a billet blank.
cam chain tensioner
stock H-D M8 cam on the left, Wood Performance WM8-222 cam on the right. Note the lobes are pressed on the factory cam, the aftermarket cam is machined from a billet blank.
The lifter blocks and lifters do not need to removed. For holding the lifters to allow cam plate removal we use the same Twin Cam magnetic tools for holding the lifters in place on the M8, there are other simple ways to hold them as well including the binder clip method. NOTE: we recommend replacing & upgrading lifters at the same time as part of a complete cam swap.
Carefully clean & inspect the cam & cam plate, liberally apply assembly lube to the camshaft
Replace o-ring on feed oil port, install cam plate into the engine cases, install screws loosely
Use rear wheel to roll engine over to ensure the oil pump does not bind. Tighten cam plate screws in sequence according to manual, do not final torque. Turn engine until the flat surface on the crankshaft is horizontal. Carefully torque cam plate bolts in steps as listed in service manual. Final torque on these bolts is 120 in-lb
Install cam sprockets & chain. Use red loctite on these fasteners. You can use the same locking tool as a Twin Cam. Double check sprocket alignment and cam spacing. Carefully torque cam sprocket bolt to 34 ft-lb, crankshaft sprocket to 25 ft-lb

Note cam timing marks. The dot on the upper sprocket will be at 6:00, the dot on the lower sprocket is at 12:00. Install tensioners, use blue loctite and final torque is 120 in-lb
Install pushrods and follow the full adjustment procedure. Adjust pushrods to spec based on the thread pitch listed by the manufacturer and for the specific lifter you are using.
Install cam cover, you are now ready to install the exhaust system and other components that were removed for cam installation
Seasoned HDF Member


Joined: Aug 2017
Posts: 7,323
Likes: 11,757
From: Omaha,NE
There is an important step missing from post #5. The timing gears need to be checked for alignment with a straight edge and feeler gauges, and corrected with shims if necessary. I believe the tolerance is up to .009". HD makes a shim kit p/n 25566-06 that includes new bolts and an assortment of washers in varying thicknesses.
Trending Topics
Road Captain
Joined: Oct 2013
Posts: 503
Likes: 47
From: nj
HD Forum Stories
The Best of Harley-Davidson for Lifelong Riders

8 Best Harley-Davidson Motorcycles Ever
Pouria Savadkouei
10 Worst Harley-Davidson Motorcycles Ever
Pouria Savadkouei
Killer Custom's Jail Break Is The Breakout That Refused to Blend In
Verdad Gallardo
Crazy Bunderbike Build Looks Amazing, But Is It Impossible to Ride?
Verdad Gallardo
Harley-Davidson Reveals Super Cool Cafe Racer Concept
Verdad Gallardo
Engraved Rebellion: Inside Bundnerbike's Glam Rock II
Verdad Gallardo
10 Motorcycles You Should Never Buy
Joe Kucinski
10 Things Harley-Davidson Needs to Fix in 2026
Verdad Gallardo
Southpaw Super Glide: A Left-Hand-Drive 1979 Harley FXE Built to Fit the Rider
Verdad GallardoSeasoned HDF Member


Joined: Jul 2013
Posts: 11,185
Likes: 7,961
From: In my head
Jamie gave you guys the "short version" of the install. Lots of procedures left to do from beginning to end including cutting of the pushrods, Just don't get in there and start cutting without reading the service manual or watching this done on youtube a half dozen times to understand how it's done properly. strych9 is right, about the timing gears and shim washers. Lots of stuff to do but many thanks to Jamie for showing us how it's done. You can bet the guys at FM can do this in their sleep.
Stellar HDF Member
Joined: Feb 2013
Posts: 2,325
Likes: 333
From: Upper Providence Pa
There is an important step missing from post #5. The timing gears need to be checked for alignment with a straight edge and feeler gauges, and corrected with shims if necessary. I believe the tolerance is up to .009". HD makes a shim kit p/n 25566-06 that includes new bolts and an assortment of washers in varying thicknesses.