


Crossbones pillion peg bracket install - help
Thread Starter
|
Cruiser
Joined: May 2010
Posts: 231
Likes: 1
From: Milton Keynes, UK
Arghhh ....
Thought the pillion peg brackets would be a breeze.
I have the black HD pillion peg kit, on RHS (brake pedal side) the mounting point is between the exhausts, however the bolt that in the kit not long enough? And before you ask they both same length RHS and LHS
Anyone else have this problem?
Ground down the bracket 1/4 inch, then realised that the footpeg (I got the HD black tribals) isn't going on without the exhaust coming off. That wasn't happening with 15 mins of my lunch break left ... I might pay for this one...
Stellar HDF Member


Joined: Oct 2009
Posts: 2,054
Likes: 26
From: Florida
Arghhh ....
Thought the pillion peg brackets would be a breeze.
I have the black HD pillion peg kit, on RHS (brake pedal side) the mounting point is between the exhausts, however the bolt that in the kit not long enough? And before you ask they both same length RHS and LHS
Anyone else have this problem?
Ground down the bracket 1/4 inch, then realised that the footpeg (I got the HD black tribals) isn't going on without the exhaust coming off. That wasn't happening with 15 mins of my lunch break left ... I might pay for this one...
Thought the pillion peg brackets would be a breeze.
I have the black HD pillion peg kit, on RHS (brake pedal side) the mounting point is between the exhausts, however the bolt that in the kit not long enough? And before you ask they both same length RHS and LHS
Anyone else have this problem?
Ground down the bracket 1/4 inch, then realised that the footpeg (I got the HD black tribals) isn't going on without the exhaust coming off. That wasn't happening with 15 mins of my lunch break left ... I might pay for this one...
Just some advice: Next time a bolt is not long enough to thread through a couple of parts, buy a longer bolt from the hardware store in stainless steel for less than a dollar instead of potentially ruining a part by altering it in order to make it work with the shorter bolt! Sorry. Not trying to make you feel stupid or anything but from experience, if you do many of your own mods you may run into this issue on a somewhat regular basis. I do many mods myself in which I am using parts that I bought off eBay and come with no hardware. In many cases the stock hardware on my bike may not work so I make a list of what bolts or nuts, etc don't work and what I need and then I hit up ACE Hardware who has a nice selection of polished stainless steel nuts and bolts that look great on the bike.
I hate to say it but if you did get the right kit and ground down your peg bracket then you may have ruined it. I think with the shorter length on the exhaust side, it is going to put the peg AND the passenger's foot too close to the exhaust.
Another possibility is that you were trying to mount it to the wrong location? But from the sound of it, your kit may have had the wrong length bolt or as I initially asked, maybe not the right kit?
A possible fix is to determine what length of bolt you would have needed BEFORE you ground the part down. Then I would go to the hardware store and get that bolt AS WELL AS a 1/4 inch spacer (the amount that you ground off your part). ACE Hardware carries these spacers in chrome. They are essentially really thick washers that come in different thickness with 1/4 being the smallest I think. Then slide your new bolt through your peg mount and then slide the spacer onto the bolt after that. This would place the spacer between the frame of your bike and the peg bracket and give you back the length you need to allow for proper foot clearance and to allow you to install the peg without removing your muffler. The way the peg fits between the exhaust on that side would hide the fact that you have that spacers on there.
Good luck.
Thread Starter
|
Cruiser
Joined: May 2010
Posts: 231
Likes: 1
From: Milton Keynes, UK
You spot on skeez, I should have had a sit down and asked on here before modifying anything. Unfortunately UK is land of metric so the local hardware store will struggle with bolts n stuff.
Did you install bracket and then manage to mount footpeg on to bracket without touching exhaust, it looks an impossibility at first glance? I have Khromewerks mufflers, so it shouldn't make a diff from stock.
Lesson learned I think .. I may just buy another kit or swap brackets over, I just didn't want to wait more more parts / bolts as I'm nearly done with my mods
Appreciate the reply will let y'all know how it turns out
Stellar HDF Member
Joined: Oct 2009
Posts: 2,054
Likes: 26
From: Florida
You spot on skeez, I should have had a sit down and asked on here before modifying anything. Unfortunately UK is land of metric so the local hardware store will struggle with bolts n stuff.
Did you install bracket and then manage to mount footpeg on to bracket without touching exhaust, it looks an impossibility at first glance? I have Khromewerks mufflers, so it shouldn't make a diff from stock.
Lesson learned I think .. I may just buy another kit or swap brackets over, I just didn't want to wait more more parts / bolts as I'm nearly done with my mods
Appreciate the reply will let y'all know how it turns out
Did you install bracket and then manage to mount footpeg on to bracket without touching exhaust, it looks an impossibility at first glance? I have Khromewerks mufflers, so it shouldn't make a diff from stock.
Lesson learned I think .. I may just buy another kit or swap brackets over, I just didn't want to wait more more parts / bolts as I'm nearly done with my mods
Appreciate the reply will let y'all know how it turns out
UK, huh? Well I guess the fix that I suggested still applies. I have to imagine that the spacers that I am talking about are a common hardware item. If anything you can just take some appropriately sized washer and stack them onto the end of the bolt with the peg bracket in place in order to give you back the length. You would still need to get a longer bolt if yours are in fact too short. I am guessing that is where you are running into an issue? Finding a 3/8-16 bolt in the good ole metric UK? I have to admit that I am surprised. Here in the States, every hardware store carries an extensive selection of both SAE and Metric nuts and bolts. Similarly, tool suppliers such as Sears carry everything in metric as well which is good because occasionally even a Harley will have a nut or bolt in metric. The last example I found of this is my rear axle nut which is a 36mm as apposed to a 1 1/4" as I initially thought!
Anyway...to answer your other question; I did not in any way need to touch my exhaust to get my peg onto the mount. Without having my Bones right in front of me, I can guess that there was at least 1/2" inch of clearance if not more. I would have noticed any difficulty in installing the peg since it requires enough clearance for the use of retaining ring pliers.
I hate to think that you will have to buy another set up. Harley parts are not cheap here in the States and I know the the price goes up considerable for anyone in any other part of the world! Wish there was more I could do to help out. Keep us posted. I am curious now to see what the solution is for you.
Thread Starter
|
Cruiser
Joined: May 2010
Posts: 231
Likes: 1
From: Milton Keynes, UK
I've figured it out. cos I cut the bracket, the bit where the clevis pin fits was much closer to exhaust, hence lack of access.
In my defence m'lud ...
I was rushing and panicking cost I had borrowed a skinny torx socket (my 3/4 short mounted was useless; I was in my dinner hour and I wanted to get it done and the tool returned ...
I'm gonna take the pain and buy a new bracket .. more like 1/2 inch I hacked off ... i'm not the first wont be the last! Thanks for input guys will let you know how I get on, everything else is done!
Trending Topics
Stellar HDF Member
Joined: Oct 2009
Posts: 2,054
Likes: 26
From: Florida
I've figured it out. cos I cut the bracket, the bit where the clevis pin fits was much closer to exhaust, hence lack of access.
In my defence m'lud ...
I was rushing and panicking cost I had borrowed a skinny torx socket (my 3/4 short mounted was useless; I was in my dinner hour and I wanted to get it done and the tool returned ...
I'm gonna take the pain and buy a new bracket .. more like 1/2 inch I hacked off ... i'm not the first wont be the last! Thanks for input guys will let you know how I get on, everything else is done!
In my defence m'lud ...
I was rushing and panicking cost I had borrowed a skinny torx socket (my 3/4 short mounted was useless; I was in my dinner hour and I wanted to get it done and the tool returned ...
I'm gonna take the pain and buy a new bracket .. more like 1/2 inch I hacked off ... i'm not the first wont be the last! Thanks for input guys will let you know how I get on, everything else is done!
In your haste, you have learned another rule of thumb about working on your bike. NEVER RUSH ANYTHING! There are very few things that I would attempt to do during my lunch break unless it is something I have done before and only if I have a proper set of tools at my disposal. Otherwise, I wait until I am in my garage with my six foot tall Craftsman tool chest full of tools close by and at least a couple of hours to spare in case "$h!t happens.
Anyway. I am sure you don't need a lecture on top of having to replace your stuff!
Hope this next install goes well.
Take care.
HD Forum Stories
The Best of Harley-Davidson for Lifelong Riders

Jason Momoa Is Turning Classic Harleys Into PHEVs
Verdad Gallardo
Harley-Davidson Fat Boy Becomes a Dark, Decepticon-Inspired Custom
Verdad Gallardo
6 Weirdest Harley-Davidsons Ever Sold to the Public
Verdad Gallardo
7 Times Harley-Davidson Chucked Tradition Out the Window
Verdad Gallardo
7 Surprising Harley-Davidson Products that Are Not Motorcycles
Verdad Gallardo
8 Best Harley-Davidson Motorcycles Ever
Pouria Savadkouei
10 Worst Harley-Davidson Motorcycles Ever
Pouria Savadkouei
Killer Custom's Jail Break Is The Breakout That Refused to Blend In
Verdad Gallardo
Crazy Bunderbike Build Looks Amazing, But Is It Impossible to Ride?
Verdad GallardoThread Starter
|
Cruiser
Joined: May 2010
Posts: 231
Likes: 1
From: Milton Keynes, UK
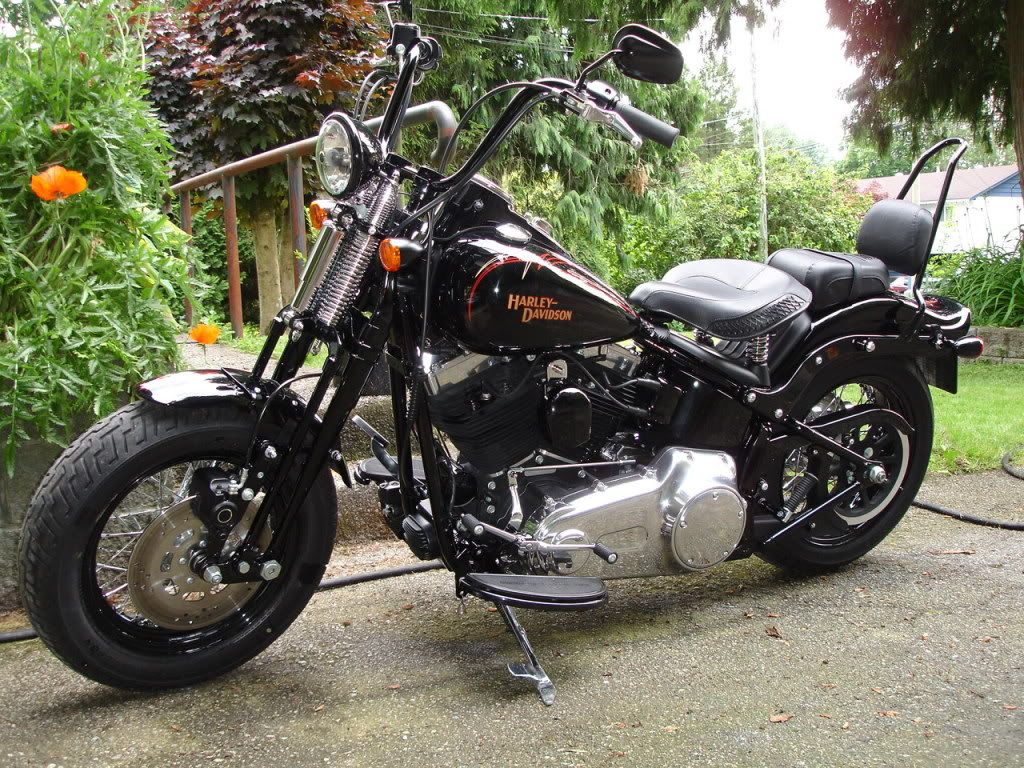
Pillion pegs on, what would have helped is picking the right installation hole on the exhaust side; I had speed read the instructions and used the bolt hole where the exhaust bracket mounts, should have read instructions carefully and noticed that the correct mount has a black blanking plug ... Had a couple washers to use as a spacer
Is ok a dose of humility is always good for me!
All installed and she looking great. The icing on the cake just put on today, a shiny RSD headlight bracket .. i'm done; for now ....
Is ok a dose of humility is always good for me!
All installed and she looking great. The icing on the cake just put on today, a shiny RSD headlight bracket .. i'm done; for now ....

Thread
Thread Starter
Forum
Replies
Last Post
09, 2010, bones, bracket, cross, crossbobes, crossbones, exhaust, footpeg, harley, installing, instructions, kit, passenger, pegs, pillion