


Removing control wire pins from harness

Thread Starter
|
Cruiser
Joined: Oct 2010
Posts: 196
Likes: 0
From: Bloomington, IL
Ok, so I lifted the tank and unplugged the control wires from the harness in prep of running them internally of my new bars. What are the tips/tricks to removing the wire pins from the connector?
Tourer
Joined: Sep 2008
Posts: 259
Likes: 1
From: Kansas City, MO
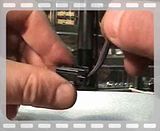
after you seperate the connectors, slide the orage rubber band back, take the orane plactic plug/seperater out, channel locks work pretty good, grab it on the two hole sides not the four. if grabbed on the four hole sides it can fold in half and ruined. see the pic
once thats done, look inside and youll see 8 little tabs. take a small....SMALL flatblade screwdiver lift the tabs and carefully remove the wires. sounds confusing without seeing pictures. do yourself a favor and take notes as to which wire goes to which location. its really simple and you do not need any special tools. im gonna bet that if you do a search on this theres alot of info. also youtube it, i watched a couple decent videos to get the idea.
once thats done, look inside and youll see 8 little tabs. take a small....SMALL flatblade screwdiver lift the tabs and carefully remove the wires. sounds confusing without seeing pictures. do yourself a favor and take notes as to which wire goes to which location. its really simple and you do not need any special tools. im gonna bet that if you do a search on this theres alot of info. also youtube it, i watched a couple decent videos to get the idea.
Thread Starter
|
Cruiser
Joined: Oct 2010
Posts: 196
Likes: 0
From: Bloomington, IL
After I read my service manual it was pretty easy. When in doubt, read the instructions right?!? I made a couple diagrams for myself to make sure I get everything together when I am ready to install the connectors again. I actually cut off some of the covering to make the wires go through the bars easier. I'm going to get some heat shrink to recover the bare wire outside of the bars and then also get some braided hosing for a clean/custom look. Tomorrow I'll be ordering my control cables and mirrors and foot controls/boards a la Tom (Malingerer) because they just look too damn good to pass up. I also think I am finally going to pull the trigger on the shotgun. Drew, can you get me the Progressive Monotubes for a 2010 FLSTN? I was going to go the drop-in/ricor route, but since I am starting from scratch, I figured the mono's might be the play for me.
Seasoned HDF Member


Joined: May 2005
Posts: 10,232
Likes: 9,282
From: Georgia
Really no need to mark wires unless you take both side of the connector apart.They only plug up one way.
Trending Topics

Advanced
Joined: Apr 2010
Posts: 63
Likes: 0
Just curious, but do you have to drain and remove the tank or can it be lifted enough to get to the wiring harness?
HD Forum Stories
The Best of Harley-Davidson for Lifelong Riders

7 Surprising Harley-Davidson Products that Are Not Motorcycles
Verdad Gallardo
8 Best Harley-Davidson Motorcycles Ever
Pouria Savadkouei
10 Worst Harley-Davidson Motorcycles Ever
Pouria Savadkouei
Killer Custom's Jail Break Is The Breakout That Refused to Blend In
Verdad Gallardo
Crazy Bunderbike Build Looks Amazing, But Is It Impossible to Ride?
Verdad Gallardo
Harley-Davidson Reveals Super Cool Cafe Racer Concept
Verdad Gallardo
Engraved Rebellion: Inside Bundnerbike's Glam Rock II
Verdad Gallardo
10 Motorcycles You Should Never Buy
Joe Kucinski
10 Things Harley-Davidson Needs to Fix in 2026
Verdad Gallardo
Thread Starter
|
Cruiser
Joined: Oct 2010
Posts: 196
Likes: 0
From: Bloomington, IL
It might be possible to coax it around and get to the harness, but draining and removing the tank is really easy. If you're prepared, you can actually do it without spilling any gas. All I ended up with was some splattering on the floor. I'm doing monotubes, risers, and bars are next week, so having the tank off is one less thing to worry about now.

Thread
Thread Starter
Forum
Replies
Last Post