When you click on links to various merchants on this site and make a purchase, this can result in this site earning a commission. Affiliate programs and affiliations include, but are not limited to, the eBay Partner Network.
I got this idea from various forums and sites on internet and decided to make one for my bike. I wired a momentary on push button switch to my spare garage door remote and then installed it under the right side cover. There was already an existing hole where I mounted the push button switch, so no drilling needed.
Home-brew lights between saddlebags and rear fender.
I'm cheap. My "cheapness" is legendary among the folks with whom I ride. For instance...Harley sells front axle net covers for $30.00. I always like to have my nuts covered, (ba dump bump!) but for that much money I figured I'd do it myself. I fashioned a pair out of PVC pipe end caps for about $1.50. Ya can't tell the difference, either! Anyway, I decided that I wasn't going to spend $300.00 on the HD Electra Glo lights that fit between the saddlebags and the rear fender. I had already forked over that much for the Electra Glo run/turn/brake lights for the saddlebags, so another $300.00 was not gonna happen. I made my own. No...they aren't as pretty as the Electra Glo lights. No...they aren't turn/brake and tail lights. Mine are tail lights only. But for about $50.00 total I can live with that. Below are photos showing how I built them. I didn't add any pictures of how I wired it into the bike, though. There are many ways to do that. You pick your own.
Speaking of wiring, originally I tapped into the wiring that came with the Electra Glo HD saddlebag run/turn/brake lights. It didn't work! I believe the fact that LEDs are diodes had something to do with it. Simply wiring my home-brew lights in parallel with the Electra Glo lights resulted in only one half of each Electra Glo light being illuminated and my home-made lights didn't come on at all. If I unhooked the saddlebag lights, my home-made lights worked fine as run/tail/brake. Put the HD lights back in the circuit and it didn't work again. Rather than futzing around with it until I blew up the control module for the $300.00 saddlebag HD lights I tapped into the auxiliary power port wiring inside the tour pak. Hence they are running lights only. Even with that I'm happy with all the red lights on the aft end of the bike. People ought to be able to see me now. Maybe down the road I'll research a way to make 'em turn and brake lights, too.
First two photos: I went to Target and bought a pack of 1/8" thick plastic cutting boards that are easily cut and sanded, and quite durable. I made a cardboard template of
the chrome saddlebag support seen between the saddlebags and the fender, then transferred that to the cutting board. Cut it out with a jigsaw and sanded the
edges. Drilled 3/4" holes to accept the LED lights I bought at Wal-Mart. I obviously made two of them, as you can see in the second photo.
Third photo: Went to Wally World and found these LED lights. There are two in each pack. I had already removed one when I took this picture.
Fourth and fifth photos: After squirting the front of the panels with black Plasti-Dip, I inserted the LEDs. Flipped them over and carefully wired them
up using shrink-tubing and wire ties. Next step was to spray the dickens out of the back side of the panel and the wiring with more Plasti-Dip. I gave the
back sides about 4 heavy coats of the stuff. (No photo of that.) It makes them quite weather proof and assures no short circuits, etc. Very important step
if you ask me.
I mounted them by running long machine screws through two holes I drilled between the top two and bottom two LEDs. I cut 2 chunks of cutting board
that were as wide as the pieces holding the LEDs, but only about 3/4 as tall. Drilled holes in the two new chunks that corresponded to the holes in the
pieces that held the LEDs. Slapped them on the front side of the saddlebag support bracket, held the light fixture on the back of the bracket and fumbled
around until I got the screws through the appropriate holes. Fastened them with lock washers and nuts. I was concerned that the threads on the machine
screws might eat through the Plasti-Dip and shrink-tubing from vibration over time, so I put two layers of shrink-tube over the threads and shrunk 'em down.
I left enough of the threads showing on the ends of the screws for the washers and nuts. The two pieces kinda sandwich the bracket...one on each side as
seen in the "highly detailed and accurate mechanical drawing" below. I'm too lazy to go to the shop and yank one of the saddlebags off in order to take
a photo.
As I mentioned before, I tapped into the auxiliary power port wiring inside the tour pak (not used on my EG Ultra) for power. That requires that you take out
the tour pak liner, which requires that you remove the tether that keeps the lid from opening too far. Be careful! If you forget that the tether is unhooked you
might flip if open and bend the hinges, or worse! I reinstalled the tether after removing the liner...just in case I had a brain fart and threw the lid open. Next you
must remove the 4 bolts that actually hold the tour pak to the bike so you can take out the metal base plate to gain access to the wiring. Again...be careful!
The tour pak is completely loose at that point and could fall off. The service manual (good thing to have with you) says to install a couple of bolts and nuts to
temporarily hold the tour pak in place.
Back to wiring. You can cut the wire for the auxiliary power port if you want, or you can buy the correct plug at the dealer. Regardless, use shrink wrap and
electrical tape to make a secure connection that is protected from being pinched and shorting out on something.
There is a large bundle of wires going from the inside of the right front corner of the tour pak to the outside world. (See another great illustration below. Harley
corporate will see these drawings and surely ask me to help illustrate their next service manual. Yeah...right.) I was able to easily shove the 16 ga wire
through the same hole as the large bundle. From there you can wire it up as you see fit. I suggest using a flexible plastic sleeve to protect ALL the wiring outside
of the tour pak. You definitely don't want anything shorting out. I ran mine down the sides of the tour pak support. I wire-tie all my electrical projects to the max.
I was a Police Dispatcher for a metropolitan department, and on my days off I helped the radio guys install all the equipment in our new vehicles. Radios, lights,
computers, sirens, etc. I learned that overkill isn't always enough. When you think you have it all secured, double check and tie it down and tape it up a little bit
more.
When you are satisfied with your wiring, put it all back together.
Last photos: The final results.
In the last photo above you'll note that the side marker lights on the tour pak are hanging loose. Those have to come loose to remove the metal base plate,
and at this point I hadn't reinstalled it yet.
As is usually the case, I'd do a few things differently if I was to do it again, but I like it so far.
I still have the stock air box, so due to the state of the Canadian dollar I thought I've give it a go at making my own external breather system. DK Custom sells kits and when I go to a different air cleaner I'll need to get one of their set ups.
3' of 7/32 vac/washer rubber tubing, 1 k&n 62-1600bl air filter, 1 "T" fitting and 1 3/8-1/4 barbed union.
$28.67 after taxes
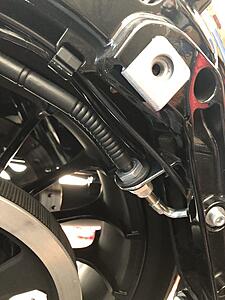
I liked the idea of having the hose coming out the top versus the bottom. The hose runs along the back bone to just infront of the battery. I have DK's 2" deluxe tank lift which gave me enough clearance for the hose. There is a grove under the rear tank mount on both sides the right side is in use but I had room on the left side. There might be enough room without the tank lift not sure.
I used two short pieces of the 7/32 hose filled with silicon to fill the holes in the back of the filter.
I'm sure this is probably on here somewhere but I wasn't reading through 2100 posts to see.
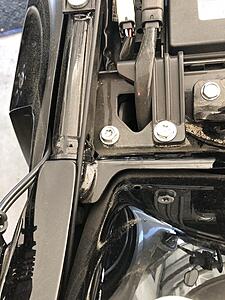
I removed the stock antenna on my RGS and replaced it with a shorty, which sucked and wouldn't pick up any stations. So I decided to use the stocker, but under the fender. I removed the antenna base by loosening the 3/4" nut. I then flipped it over and put it through the grommet the wire previously went through and tightened the nuts back down. I routed the antenna up through where the fender and the frame where the seat is, then forward back into the frame under the gas tank. It has a slight bend in it but doesn't kink or push on anything. The mount is also study and keeps everything away from the belt and tire. Immediately I was able to pick up the old stations I had lost. Typically I Bluetooth to my phone but it's good to listen to the radio on occasion.
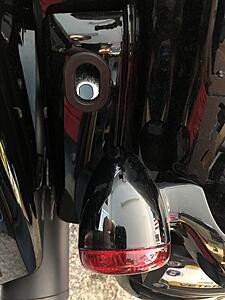
I think I'll make a trip this weekend to a HD dealer and try to get an antenna hole cover.
Last edited by RiggerWings; Mar 8, 2019 at 05:28 PM.
So I decided to use the stocker, but under the fender. I removed the antenna base by loosening the 3/4" nut. I then flipped it over and put it through the grommet the wire previously went through and tightened the nuts back down. I routed the antenna up through where the fender and the frame where the seat is, then forward back into the frame under the gas tank. It has a slight bend in it but doesn't kink or push on anything. The mount is also study and keeps everything away from the belt and tire. Immediately I was able to pick up the old stations I had lost. Typically I Bluetooth to my phone but it's good to listen to the radio on occasion.
Except the rubber antenna hole plug. That one broke the bank at $2.12 at the dealer. I rode 106 miles round trip to pick it up, it was beautiful here in South Georgia yesterday.
If anyone needs the antenna hole cover, it's p/n 59749-06 "Plug, Rear Fender"
i bought a 2010, and had to do the "wire spot lights on" so took a few pics to get in the HDF spirit. been covered plenty, but though some new pics might be good near the top of this thread.
Sun came out today at 5 pm so went for a ride to check out the seat and grips. Also to see if I'm getting any oil buildup in my home made EBS. Seat sits me a little higher or maybe it's just that it's wider, I can just flat foot with it. Grips are comfortable, No oil buildup so all's good.
7 Surprising Harley-Davidson Products that Are Not Motorcycles
Slideshow: The bar-and-shield logo shows up on far more than motorcycles, some of the company's most unexpected products have nothing to do with riding.
Slideshow: From the troubled AMF years to modern misfires, these bikes earned reputations for reliability issues, questionable engineering, or disappointing performance.
Crazy Bunderbike Build Looks Amazing, But Is It Impossible to Ride?
Slideshow: The Swiss custom shop has taken a Harley Softail and stretched it into something so long and low that it looks closer to a rolling sculpture than a conventional motorcycle.
Engraved Rebellion: Inside Bundnerbike's Glam Rock II
Slideshow: A standard cruiser becomes an intricate metal canvas in the hands of a Swiss custom house known for pushing Harley-Davidson platforms far beyond their factory brief.
Slideshow: Harley-Davidson's challenges aren't abstract; they show up in dropping shipments, shrinking dealer traffic, and strategic decisions that aren't yet translating into growth.


 If I unhooked the saddlebag lights, my home-made lights worked fine as run/tail/brake. Put the HD lights back in the circuit and it didn't work again. Rather than futzing around with it until I blew up the control module for the $300.00 saddlebag HD lights I tapped into the auxiliary power port wiring inside the tour pak. Hence they are running lights only. Even with that I'm happy with all the red lights on the aft end of the bike. People ought to be able to see me now. Maybe down the road I'll research a way to make 'em turn and brake lights, too.


 ) I was able to easily shove the 16 ga wire