


Project "Cheapskate"
Batman,
A sincere thanks for all the extra work it took to take the pics and write up all the steps you went through during the re-build. We all know that keeping us updated and in-the-loop was extra work. I'm definitly inspired to do more work on my bikes myself after watching you do so much.
It's appreciated. Thanks!
Dave Mac.
Thread Starter
|
Cruiser
Joined: Jan 2012
Posts: 246
Likes: 1
From: NE
Batman,
A sincere thanks for all the extra work it took to take the pics and write up all the steps you went through during the re-build. We all know that keeping us updated and in-the-loop was extra work. I'm definitly inspired to do more work on my bikes myself after watching you do so much.
It's appreciated. Thanks!
Dave Mac.
A sincere thanks for all the extra work it took to take the pics and write up all the steps you went through during the re-build. We all know that keeping us updated and in-the-loop was extra work. I'm definitly inspired to do more work on my bikes myself after watching you do so much.
It's appreciated. Thanks!
Dave Mac.
Could use more pics outside @ different angles, please & thank you. Did you get the windscreen yet?
Toby
I'll take some pictures Sunday and get them posted. I just took off the S/G front turn signals and put on new passing light arms, so it's changed a little bit. The windscreen is in the works. Batman logo with project cheapskate below. Can't wait....
Rick
Thread Starter
|
Cruiser
Joined: Jan 2012
Posts: 246
Likes: 1
From: NE
Just got back from a 40 mile ride, here are the pictures with the new passing lights installed. Found a pair of bare bars on eBay. Added my passing lights from the Ultra bars, and the turn bullet signals off the S/G brackets. I had to buy the turn signal standoffs at the dealer for the bullets, and cut 1/2" off the length of the hollow mounting bolt on the passing light housings, but all in all it only took about an hour to do.

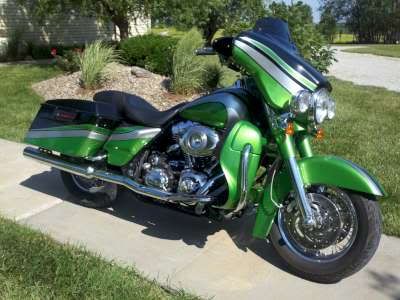


And the same problem happened, I drove right onto the sidewalk and took the pictures after the ride. Then went to start it to put it in the shop and just a click click from the relay. I don't even think I heard the fuel injection power up. I checked the voltage at the starter lug to ground and I have 12.96 so it is fully charged. Anybody heard of "heat soak" issues with the starters?
And the same problem happened, I drove right onto the sidewalk and took the pictures after the ride. Then went to start it to put it in the shop and just a click click from the relay. I don't even think I heard the fuel injection power up. I checked the voltage at the starter lug to ground and I have 12.96 so it is fully charged. Anybody heard of "heat soak" issues with the starters?
Last edited by Batman7349; May 20, 2012 at 04:47 PM.
Road Master
Joined: Nov 2004
Posts: 1,227
Likes: 2
From: Coral Springs, Florida
Just got back from a 40 mile ride, here are the pictures with the new passing lights installed. Found a pair of bare bars on eBay. Added my passing lights from the Ultra bars, and the turn bullet signals off the S/G brackets. I had to buy the turn signal standoffs at the dealer for the bullets, and cut 1/2" off the length of the hollow mounting bolt on the passing light housings, but all in all it only took about an hour to do.
And the same problem happened, I drove right onto the sidewalk and took the pictures after the ride. Then went to start it to put it in the shop and just a click click from the relay. I don't even think I heard the fuel injection power up. I checked the voltage at the starter lug to ground and I have 12.96 so it is fully charged. Anybody heard of "heat soak" issues with the starters?
And the same problem happened, I drove right onto the sidewalk and took the pictures after the ride. Then went to start it to put it in the shop and just a click click from the relay. I don't even think I heard the fuel injection power up. I checked the voltage at the starter lug to ground and I have 12.96 so it is fully charged. Anybody heard of "heat soak" issues with the starters?
Road Warrior
Joined: Oct 2006
Posts: 1,350
Likes: 46
Might try putting an extra ground straight to the starter. I know they had some problems with the starter bolt torque not being tight enough on 07-08's and all it took was to tighten them down just a little. My friends 07 SG did that to him a couple of times, told him to check the bolts on his starter, he checked them & they turned not even a 1/4 turn, solved his problem. If you painted where the starter goes, may want to go in & clean that surface, since it uses that area to ground.
Toby
Toby
Thread Starter
|
Cruiser
Joined: Jan 2012
Posts: 246
Likes: 1
From: NE
Hopefully have the starter issue fixed. The new exhaust bracket bolts to both starter mounting points. I failed to remove the paint under the bolts not realizing the ground path that Harleys use. I removed both starter bolts removed the paint under the bolts. Then went an extra step and built a ground strap from 6Ga wire and a couple of copper lugs. I bolted one end under a starter bolt and ran the other directly to the negative terminal of the battery. I also removed the ground strap from the frame mount and cleaned it. Next weekend we'll try again.
HD Forum Stories
The Best of Harley-Davidson for Lifelong Riders

7 Surprising Harley-Davidson Products that Are Not Motorcycles
Verdad Gallardo
8 Best Harley-Davidson Motorcycles Ever
Pouria Savadkouei
10 Worst Harley-Davidson Motorcycles Ever
Pouria Savadkouei
Killer Custom's Jail Break Is The Breakout That Refused to Blend In
Verdad Gallardo
Crazy Bunderbike Build Looks Amazing, But Is It Impossible to Ride?
Verdad Gallardo
Harley-Davidson Reveals Super Cool Cafe Racer Concept
Verdad Gallardo
Engraved Rebellion: Inside Bundnerbike's Glam Rock II
Verdad Gallardo
10 Motorcycles You Should Never Buy
Joe Kucinski