
DIY Cheap Mods

Intermediate
Joined: Nov 2007
Posts: 37
Likes: 0
From: Tallahassee, FL
Front Turn Signal Relocation on an FL Frontend:
Alright, here's my contribution. This is one of my favorite mods so far, and cost less than $10.00 and some time. Enjoy...
Finally got around to relocating my turn signals on my 2006 FATBOY. I know this has been a popular topic around here lately, so I just wanted to post a step-by-step process for others to reference. Hope it helps. Thanks to everyone for the input.
You are now ready to splice thewires. I used wire connector b/c my soldering gun crapped out on me in the middle of the project.
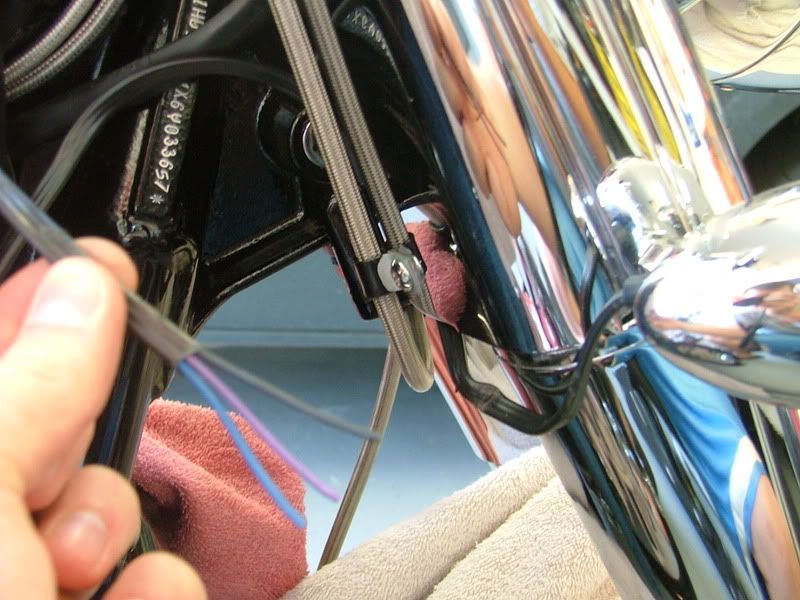
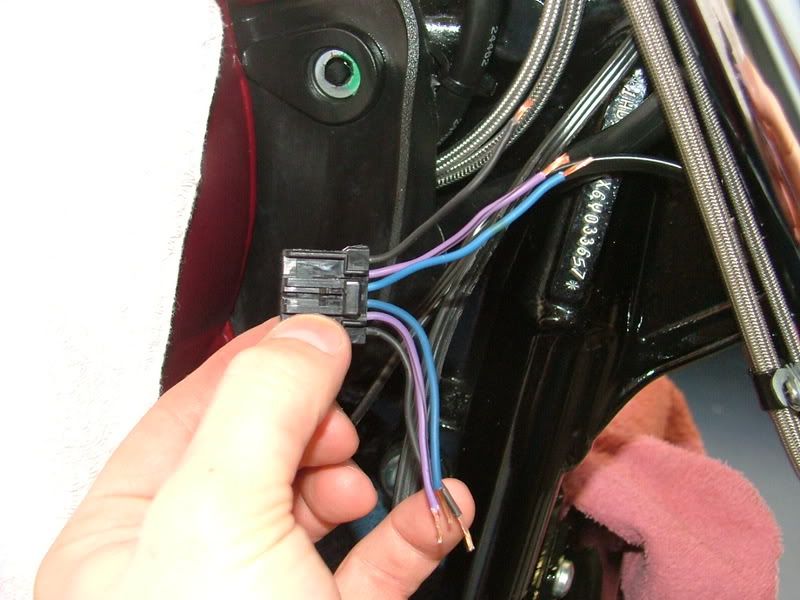
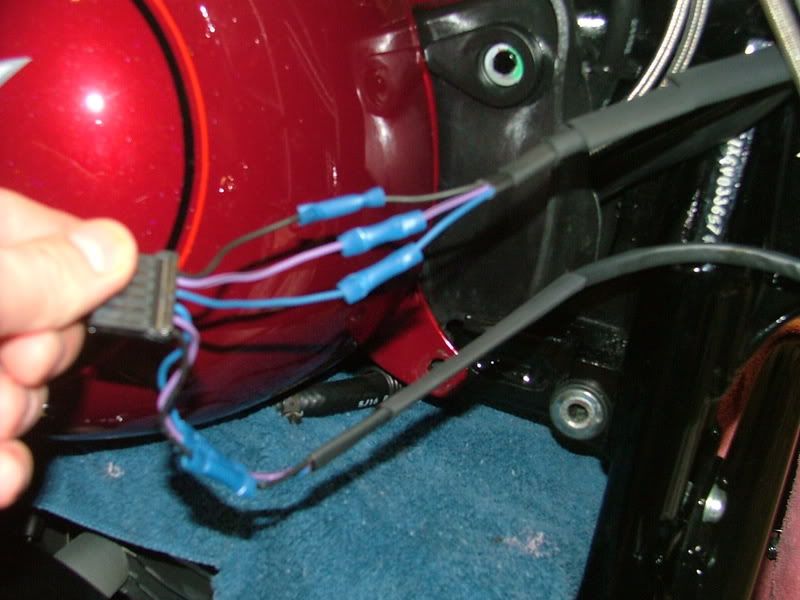
I also reccomend putting heat shrink over the splice.
Alright, here's my contribution. This is one of my favorite mods so far, and cost less than $10.00 and some time. Enjoy...
Finally got around to relocating my turn signals on my 2006 FATBOY. I know this has been a popular topic around here lately, so I just wanted to post a step-by-step process for others to reference. Hope it helps. Thanks to everyone for the input.
You are now ready to splice thewires. I used wire connector b/c my soldering gun crapped out on me in the middle of the project.
I also reccomend putting heat shrink over the splice.
Saves the risk of a splice going bad - just remember which turn signal is right and which one is left.


Advanced
Joined: Dec 2008
Posts: 98
Likes: 0
From: McAllen texas
I discovered that my 2000 FLSTC wasn't originally sold in the US. the "DOMESTIC" wiring that's in those sold here..isn't. This means I have no front and rear running lights on the turn signals. So I bought a module from Ebay that gives me run/turn/brake on the rears.. The lenses..I just use Testors translucent red paint in a spray can. I cleaned the lenses with acetone...sprayed them with red translucent paint. they look VERY nice. I'll post a pic when I can get one. After painting...and letting it dry for a few hours..I just buffed it out with some spray on wax...then some Kiwi Wet Pruf. They look like i bought them that way.
2nd Gear
Joined: Mar 2009
Posts: 6
Likes: 0
From: Houston
Thanks.
Last edited by X-Bone; Mar 11, 2009 at 01:46 AM. Reason: Speilling.
Advanced
Joined: Dec 2008
Posts: 98
Likes: 0
From: McAllen texas
You'd be surprised what works for "DIY" mods. Costly add-ons..gets too much for the budget. I've found that the black controls and plastics can be re-blackened with black liquid shoe polish. Plastic covers (lenses) can be colored with magic markers..then polished with wax to help blend the colors. Transparent paints work well also. to make designs on lenses..cover with contact paper...draw it out...the slowly cut out with exacto...remove overlay... to reverse this...draw it out on paper...cut it out..then lay the paper on the lense...apply tape and push it into the cutout..now remove the surrounding paper..leaving the tape you pushed into the cutouts.. NOT PAINT! Model paint works well..enamel..it bonds with the plastic with no more than cleaning..
Road Warrior
Joined: Dec 2008
Posts: 1,344
Likes: 1
From: NM
You'd be surprised what works for "DIY" mods. Costly add-ons..gets too much for the budget. I've found that the black controls and plastics can be re-blackened with black liquid shoe polish. Plastic covers (lenses) can be colored with magic markers..then polished with wax to help blend the colors. Transparent paints work well also. to make designs on lenses..cover with contact paper...draw it out...the slowly cut out with exacto...remove overlay... to reverse this...draw it out on paper...cut it out..then lay the paper on the lense...apply tape and push it into the cutout..now remove the surrounding paper..leaving the tape you pushed into the cutouts.. NOT PAINT! Model paint works well..enamel..it bonds with the plastic with no more than cleaning..
Tourer
Joined: Sep 2007
Posts: 253
Likes: 3
You'd be surprised what works for "DIY" mods. Costly add-ons..gets too much for the budget. I've found that the black controls and plastics can be re-blackened with black liquid shoe polish. Plastic covers (lenses) can be colored with magic markers..then polished with wax to help blend the colors. Transparent paints work well also. to make designs on lenses..cover with contact paper...draw it out...the slowly cut out with exacto...remove overlay... to reverse this...draw it out on paper...cut it out..then lay the paper on the lense...apply tape and push it into the cutout..now remove the surrounding paper..leaving the tape you pushed into the cutouts.. NOT PAINT! Model paint works well..enamel..it bonds with the plastic with no more than cleaning..

Banned
Joined: Jan 2006
Posts: 17,265
Likes: 21
From: Los Angeles, CA
Under $20 Mark III Highway pegs.
I scoured ebay for ages searching for some of these overpriced pegs. With my Laughlin trip coming up I really wanted to have some options for me feet. Finally after searching all different kind of words "highway pegs" was the magic combo. Got a used set for $16 and spent about an hour installing them. Next time I ride the twisties we shall see if the brackets taht mount them to the floorboards scrape a lot. The left bracket was quite scraped up under the floorboard already.


I scoured ebay for ages searching for some of these overpriced pegs. With my Laughlin trip coming up I really wanted to have some options for me feet. Finally after searching all different kind of words "highway pegs" was the magic combo. Got a used set for $16 and spent about an hour installing them. Next time I ride the twisties we shall see if the brackets taht mount them to the floorboards scrape a lot. The left bracket was quite scraped up under the floorboard already.
Advanced
Joined: Dec 2008
Posts: 98
Likes: 0
From: McAllen texas
hehe...then you'll be happy to know that there's another trick for that show polish that's too dried out for my boots.. MY TIRES! It's wax..it protects from liquid..like water...it protects against the UV of te sun to a certain degree. It also makes them easier to clean the next time around. so...take your black shoe polish...and polish your tires! also works on the black of the engine block!