


DIY Cheap Mods
Tourer
Joined: Jun 2010
Posts: 286
Likes: 1
I just painted Plasti-Dip on my air cleaner cover today. I think it looks much better, and if it starts to peel I can just peel it right off with no adverse effects to the stock finish, then go hget a black on or get this one coated.
$7 for the can at home depot, and a few hours worth of paint/wait paint/wait.
Here is the before and after.

$7 for the can at home depot, and a few hours worth of paint/wait paint/wait.
Here is the before and after.
6th Gear
Joined: Jan 2012
Posts: 11
Likes: 0
From: Sunny Southern California
Total cost for the mods, about $65.
I bought a stock 2007 Heritage and right away wanted to change it. Now I'm not an electrical or bolt/Dremel person, but I really didn't want it to stay stock.
Here's what it looked like the day I brought her home from her previous owner:

I went to Tandy leather and found printed cowhide on sale for $30, so I bought two half hides of the blue leather, thinking I'm going to mess this up, since I'm not a leather worker, so I better have extra. Turns out I was a bit pessimistic, because it worked!
Cutting the pattern for the seat was the hardest part. It's a "U" shape with no straight lines in it anywhere.
Here's the seat:

Taking the seat off, I removed the bazillion staples that are on the underside to get the leather removed. Next was to rip the pieces apart to replace the "U" shape with the new leather. I drew the pattern and carefully cut the hide to match. I sewed this on a regular Pfaff sewing machine (ask your wives). It's an antique, and a good one. It handled the leather stitching with upholstery thread. Imagine my surprise when I discovered that the OEM seat is NOT real leather, except for the parts that have the studs. So sewing it isn't all that tough, I used a leather needle in the machine to do it. There are a couple of small wrinkles that I can live with, due to my lack of skills and the fact that the original fake leather stretches better than the real stuff.
I did the seat after doing the very first mod, which was to cut a pattern and do the console. I never liked the chrome/satin icky stock console. The bib came second, and has black leather-wannabe piping around it. i stitched the hooky part of velcro to the leather below the console, and it holds my iPhone/iTouch or anything else that has the loopy stuck to it. I made a small pocket that doubles as a map pouch (clear front) that also can be put on the hooky part:

I used 6000 glue (found in craft and beading supply stores) to hold the leather to the console, and so far, no problems.
Here's the complete view:

Next was to do something with the floorboards. I made fringes for another rider out of pink leather (yes, another woman rider, YEAH!) and knew I couldn't do fringe for myself, because I scrape the floorboards too much--they'd be shredded in a week. So here's my solution--that same 6000 glue, the leather piping and a 3/8" strip of leather going between the rubber and the floorboard plate:

I also do the helmet hair, and painted that helmet. That's not a mod to the bike tho', so I'll just post a picture of one of my helmets, and save the discussion for another day and place. I will say that the mane of yellow and green makes me highly visible!!

I bought a stock 2007 Heritage and right away wanted to change it. Now I'm not an electrical or bolt/Dremel person, but I really didn't want it to stay stock.
Here's what it looked like the day I brought her home from her previous owner:
I went to Tandy leather and found printed cowhide on sale for $30, so I bought two half hides of the blue leather, thinking I'm going to mess this up, since I'm not a leather worker, so I better have extra. Turns out I was a bit pessimistic, because it worked!
Cutting the pattern for the seat was the hardest part. It's a "U" shape with no straight lines in it anywhere.
Here's the seat:
Taking the seat off, I removed the bazillion staples that are on the underside to get the leather removed. Next was to rip the pieces apart to replace the "U" shape with the new leather. I drew the pattern and carefully cut the hide to match. I sewed this on a regular Pfaff sewing machine (ask your wives). It's an antique, and a good one. It handled the leather stitching with upholstery thread. Imagine my surprise when I discovered that the OEM seat is NOT real leather, except for the parts that have the studs. So sewing it isn't all that tough, I used a leather needle in the machine to do it. There are a couple of small wrinkles that I can live with, due to my lack of skills and the fact that the original fake leather stretches better than the real stuff.
I did the seat after doing the very first mod, which was to cut a pattern and do the console. I never liked the chrome/satin icky stock console. The bib came second, and has black leather-wannabe piping around it. i stitched the hooky part of velcro to the leather below the console, and it holds my iPhone/iTouch or anything else that has the loopy stuck to it. I made a small pocket that doubles as a map pouch (clear front) that also can be put on the hooky part:
I used 6000 glue (found in craft and beading supply stores) to hold the leather to the console, and so far, no problems.
Here's the complete view:
Next was to do something with the floorboards. I made fringes for another rider out of pink leather (yes, another woman rider, YEAH!) and knew I couldn't do fringe for myself, because I scrape the floorboards too much--they'd be shredded in a week. So here's my solution--that same 6000 glue, the leather piping and a 3/8" strip of leather going between the rubber and the floorboard plate:
I also do the helmet hair, and painted that helmet. That's not a mod to the bike tho', so I'll just post a picture of one of my helmets, and save the discussion for another day and place.
I will say that the mane of yellow and green makes me highly visible!!
Thread Starter
|
May our Moderator Rest in Peace
Joined: Sep 2006
Posts: 11,386
Likes: 35
From: Rochester, NY
Very nicely done, not my cup of tea, I'm a bit too butch for blue I guess, but I love that you had an idea and made it work for you.


Thread Starter
|
May our Moderator Rest in Peace
Joined: Sep 2006
Posts: 11,386
Likes: 35
From: Rochester, NY
I hope your trying to make a bad joke?
Let's just give credit where credit is due and call it a day.
Hmmm,
Now I wonder how my bike seat would look with black snakeskin pattern leather?
Let's just give credit where credit is due and call it a day.
Hmmm,
Now I wonder how my bike seat would look with black snakeskin pattern leather?
Last edited by In Memoriam Citoriplus; May 2, 2012 at 07:03 AM.
Grand HDF Member
Joined: May 2008
Posts: 4,624
Likes: 189
From: Newcastle, Ca.
Total cost for the mods, about $65.
I bought a stock 2007 Heritage and right away wanted to change it. Now I'm not an electrical or bolt/Dremel person, but I really didn't want it to stay stock.
Here's what it looked like the day I brought her home from her previous owner:
I went to Tandy leather and found printed cowhide on sale for $30, so I bought two half hides of the blue leather, thinking I'm going to mess this up, since I'm not a leather worker, so I better have extra. Turns out I was a bit pessimistic, because it worked!
Cutting the pattern for the seat was the hardest part. It's a "U" shape with no straight lines in it anywhere.
Here's the seat:
Taking the seat off, I removed the bazillion staples that are on the underside to get the leather removed. Next was to rip the pieces apart to replace the "U" shape with the new leather. I drew the pattern and carefully cut the hide to match. I sewed this on a regular Pfaff sewing machine (ask your wives). It's an antique, and a good one. It handled the leather stitching with upholstery thread. Imagine my surprise when I discovered that the OEM seat is NOT real leather, except for the parts that have the studs. So sewing it isn't all that tough, I used a leather needle in the machine to do it. There are a couple of small wrinkles that I can live with, due to my lack of skills and the fact that the original fake leather stretches better than the real stuff.
I did the seat after doing the very first mod, which was to cut a pattern and do the console. I never liked the chrome/satin icky stock console. The bib came second, and has black leather-wannabe piping around it. i stitched the hooky part of velcro to the leather below the console, and it holds my iPhone/iTouch or anything else that has the loopy stuck to it. I made a small pocket that doubles as a map pouch (clear front) that also can be put on the hooky part:
I used 6000 glue (found in craft and beading supply stores) to hold the leather to the console, and so far, no problems.
Here's the complete view:
Next was to do something with the floorboards. I made fringes for another rider out of pink leather (yes, another woman rider, YEAH!) and knew I couldn't do fringe for myself, because I scrape the floorboards too much--they'd be shredded in a week. So here's my solution--that same 6000 glue, the leather piping and a 3/8" strip of leather going between the rubber and the floorboard plate:
I also do the helmet hair, and painted that helmet. That's not a mod to the bike tho', so I'll just post a picture of one of my helmets, and save the discussion for another day and place. I will say that the mane of yellow and green makes me highly visible!!
I bought a stock 2007 Heritage and right away wanted to change it. Now I'm not an electrical or bolt/Dremel person, but I really didn't want it to stay stock.
Here's what it looked like the day I brought her home from her previous owner:
I went to Tandy leather and found printed cowhide on sale for $30, so I bought two half hides of the blue leather, thinking I'm going to mess this up, since I'm not a leather worker, so I better have extra. Turns out I was a bit pessimistic, because it worked!
Cutting the pattern for the seat was the hardest part. It's a "U" shape with no straight lines in it anywhere.
Here's the seat:
Taking the seat off, I removed the bazillion staples that are on the underside to get the leather removed. Next was to rip the pieces apart to replace the "U" shape with the new leather. I drew the pattern and carefully cut the hide to match. I sewed this on a regular Pfaff sewing machine (ask your wives). It's an antique, and a good one. It handled the leather stitching with upholstery thread. Imagine my surprise when I discovered that the OEM seat is NOT real leather, except for the parts that have the studs. So sewing it isn't all that tough, I used a leather needle in the machine to do it. There are a couple of small wrinkles that I can live with, due to my lack of skills and the fact that the original fake leather stretches better than the real stuff.
I did the seat after doing the very first mod, which was to cut a pattern and do the console. I never liked the chrome/satin icky stock console. The bib came second, and has black leather-wannabe piping around it. i stitched the hooky part of velcro to the leather below the console, and it holds my iPhone/iTouch or anything else that has the loopy stuck to it. I made a small pocket that doubles as a map pouch (clear front) that also can be put on the hooky part:
I used 6000 glue (found in craft and beading supply stores) to hold the leather to the console, and so far, no problems.
Here's the complete view:
Next was to do something with the floorboards. I made fringes for another rider out of pink leather (yes, another woman rider, YEAH!) and knew I couldn't do fringe for myself, because I scrape the floorboards too much--they'd be shredded in a week. So here's my solution--that same 6000 glue, the leather piping and a 3/8" strip of leather going between the rubber and the floorboard plate:
I also do the helmet hair, and painted that helmet. That's not a mod to the bike tho', so I'll just post a picture of one of my helmets, and save the discussion for another day and place.
I will say that the mane of yellow and green makes me highly visible!!Very nice work!
Elite HDF Member
Joined: Apr 2012
Posts: 3,986
Likes: 709
From: San Diego
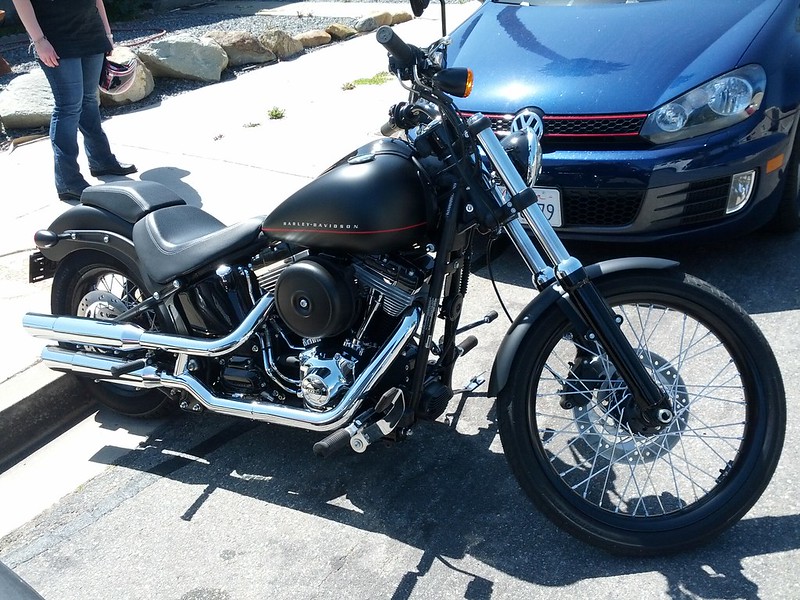
I took the stock license plate holder off my Blackline, taped a LED strip under the fender, and bolted the license plate to the metal bracket under there. Then I bent the plate to match the fender a little.


HD Forum Stories
The Best of Harley-Davidson for Lifelong Riders

7 Surprising Harley-Davidson Products that Are Not Motorcycles
Verdad Gallardo
8 Best Harley-Davidson Motorcycles Ever
Pouria Savadkouei
10 Worst Harley-Davidson Motorcycles Ever
Pouria Savadkouei
Killer Custom's Jail Break Is The Breakout That Refused to Blend In
Verdad Gallardo
Crazy Bunderbike Build Looks Amazing, But Is It Impossible to Ride?
Verdad Gallardo
Harley-Davidson Reveals Super Cool Cafe Racer Concept
Verdad Gallardo
Engraved Rebellion: Inside Bundnerbike's Glam Rock II
Verdad Gallardo
10 Motorcycles You Should Never Buy
Joe Kucinski
