


Project 124

Thread Starter
|
Ultimate HDF Member
Joined: Feb 2006
Posts: 5,939
Likes: 3
From: TX
Well…. I couldn't stand not doing anything! Who'da thought…???…. 
Here's some new hardware. Stainless intake & exhaust bolts. studs, nuts….

First thing on schedule today was CLEANING…. serious cleaning! Most things get lacquer thinner cleansing, followed by HOT soapy cleaning in Momma's kitchen sink. After things are clean & dry, they get bagged & grouped for install.

Now for some final assembly…. Rear piston on the rod, w/wristpin & clip. These longer stroke motors have the wrist pin slightly passing thru the bottom ring groove, so the piston has to go on the rod before any of the rings. Also before the bottom rings go in, is a "platform" ring that fills the gap where the wrist pin goes...

Double & triple check ring placement and be sure they are "right side up". If they have a dot, it always goes up. Here's the middle ring ~ dot up.

There's the top ring. It does not have a dot, but the inside edge has an angle cut. On a "top ring", the angle cut always faces UP. Look closely at the edge of the ring, just past the stud. on the top, inside edge, you can make out the angle cut. The cut allows air (pressure) to get behind the ring as it travels up, and forces the ring out against the cylinder wall. The opposite is true for the middle ring: the angle faces DOWN and as the pistons descends, the pressure causes it to firmly press against the cylinder walls. Make sense?

With the rear piston, cylinder, & heads installed and properly torqued, its time to move to the front. Here's one of the things that needs to be checked, particularly on the long stroke, big bore motors. There is a point, during each revolution, when the rear piston is all the way down, that the rear skirt of the front piston actually passes into the space (typically) occupied by the rear piston. Here, you can just barely see the bottom edge of the rear piston behind the curved relief in the rear cylinder spigot. S&S did an excellent job with these and clearance is A-OK. Probably goes without saying because they've been doing big motors for a LONG time, but still needs to be checked out, nonetheless.

These bigger pistons don't leave much room for working with the rings, with hose over the studs to protect the pistons. Tried something different on the front & it worked well. Hose on the load bearing studs & tape on the other two…

….and finally, both heads are in place and ready for rocker boxes, rocker, intake, etc….

More after I get back from the trade show.....
Here's some new hardware. Stainless intake & exhaust bolts. studs, nuts….
First thing on schedule today was CLEANING…. serious cleaning! Most things get lacquer thinner cleansing, followed by HOT soapy cleaning in Momma's kitchen sink. After things are clean & dry, they get bagged & grouped for install.
Now for some final assembly…. Rear piston on the rod, w/wristpin & clip. These longer stroke motors have the wrist pin slightly passing thru the bottom ring groove, so the piston has to go on the rod before any of the rings. Also before the bottom rings go in, is a "platform" ring that fills the gap where the wrist pin goes...
Double & triple check ring placement and be sure they are "right side up". If they have a dot, it always goes up. Here's the middle ring ~ dot up.
There's the top ring. It does not have a dot, but the inside edge has an angle cut. On a "top ring", the angle cut always faces UP. Look closely at the edge of the ring, just past the stud. on the top, inside edge, you can make out the angle cut. The cut allows air (pressure) to get behind the ring as it travels up, and forces the ring out against the cylinder wall. The opposite is true for the middle ring: the angle faces DOWN and as the pistons descends, the pressure causes it to firmly press against the cylinder walls. Make sense?
With the rear piston, cylinder, & heads installed and properly torqued, its time to move to the front. Here's one of the things that needs to be checked, particularly on the long stroke, big bore motors. There is a point, during each revolution, when the rear piston is all the way down, that the rear skirt of the front piston actually passes into the space (typically) occupied by the rear piston. Here, you can just barely see the bottom edge of the rear piston behind the curved relief in the rear cylinder spigot. S&S did an excellent job with these and clearance is A-OK. Probably goes without saying because they've been doing big motors for a LONG time, but still needs to be checked out, nonetheless.
These bigger pistons don't leave much room for working with the rings, with hose over the studs to protect the pistons. Tried something different on the front & it worked well. Hose on the load bearing studs & tape on the other two…
….and finally, both heads are in place and ready for rocker boxes, rocker, intake, etc….
More after I get back from the trade show.....
Last edited by PhilM; Feb 4, 2010 at 08:55 PM.
Outstanding HDF Member
Joined: Feb 2009
Posts: 2,005
Likes: 53
From: ID Ho
Looks good Phil. Nice exhuast studs!
Your back must be in much better shape than mine. I will NEVER again build a motor OUTSIDE the frame. Put the bottom end together, stab it in the frame then build the top. Much easier on the back!!!
Your back must be in much better shape than mine. I will NEVER again build a motor OUTSIDE the frame. Put the bottom end together, stab it in the frame then build the top. Much easier on the back!!!
Thread Starter
|
Ultimate HDF Member
Joined: Feb 2006
Posts: 5,939
Likes: 3
From: TX
http://tmanperformance.com/index.html You probably won't catch anyone there until the middle of next week. I believe they are enroute to the V-Twin Expo in Cinci that runs Saturday ~ Monday.
I'm open for charity support!!!
Actually, I have a chiropractor on first name basis.... : ()
I did my 120 this way too & man is it ever easier to work on this way. I've some some gorilla strong buds that I'll enlist when the time come.
There's merit and a "fit" for either strategy. Personally, I just dig working on them and "in the end" you can do some extra stuff when ya "build" vs. buy.
Whichever works & is "right" the the one foot'n the bill & twist'n the grip is the way to go.
I did my 120 this way too & man is it ever easier to work on this way. I've some some gorilla strong buds that I'll enlist when the time come.
Whichever works & is "right" the the one foot'n the bill & twist'n the grip is the way to go.
Last edited by PhilM; Feb 4, 2010 at 10:39 PM.

Ultimate HDF Member
Joined: Feb 2007
Posts: 7,663
Likes: 7
From: Northeast Ohio
Well, first off, a complete motor is going to cost you way more than if you build it yourself, all things being equal. Second, if you have the skills, you know when you are done it is exactly right. You can see that Phil is meticulous about cleanliness and double checking measurements/clearances and all other items. Yes, you can buy some big inch crate motors, but are they exacting in assembly such as this will be. I have done many builds including my big inch build, and would recommend that if you have the skills, tools and patience, to do it yourself as long as you have someone on speed dial to help you through it.
Road Warrior
Joined: Dec 2008
Posts: 1,639
Likes: 2
From: Australia
For your 04 I would go with a crate S&S, I like their cases better.
Thread Starter
|
Ultimate HDF Member
Joined: Feb 2006
Posts: 5,939
Likes: 3
From: TX
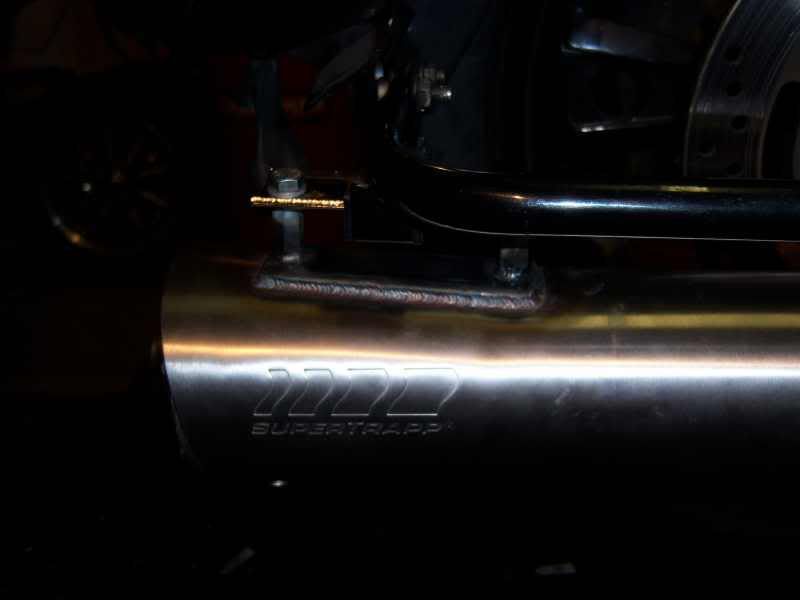
Initially, I'm gonna go with a Boarzilla headpipe with a SuperTrapp tuneable can. Kinda like what I first tried on the 120. I didn't like the Zilla on the 120, so I want back to the FC w/perf baffle. This one's gonna breath a bit more though. Here's what it looked like ~ the first time I made one...
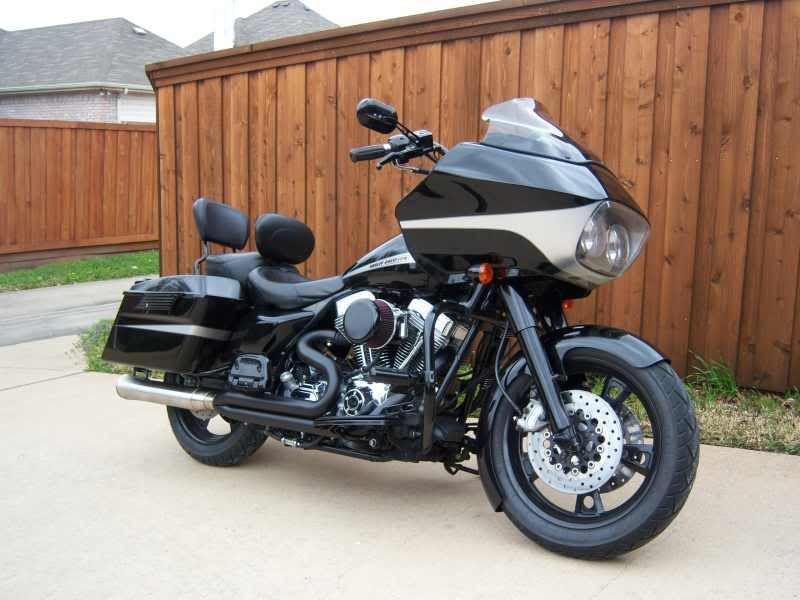
For the hanger, I just took one of the pipe hangers (form under the saddlebag) and welded it (upside down) to the can and used some threaded couplers for the mounting bolts... Worked well. Knew I never should'a sold that F'r!
If this doesn't satisfy me, I also have a new SuperMeg.
If neither of them work out, I am on the contact list for when the "Guppy 4" hits the street.
HD Forum Stories
The Best of Harley-Davidson for Lifelong Riders

7 Surprising Harley-Davidson Products that Are Not Motorcycles
Verdad Gallardo
8 Best Harley-Davidson Motorcycles Ever
Pouria Savadkouei
10 Worst Harley-Davidson Motorcycles Ever
Pouria Savadkouei
Killer Custom's Jail Break Is The Breakout That Refused to Blend In
Verdad Gallardo
Crazy Bunderbike Build Looks Amazing, But Is It Impossible to Ride?
Verdad Gallardo
Harley-Davidson Reveals Super Cool Cafe Racer Concept
Verdad Gallardo
Engraved Rebellion: Inside Bundnerbike's Glam Rock II
Verdad Gallardo
10 Motorcycles You Should Never Buy
Joe Kucinski
10 Things Harley-Davidson Needs to Fix in 2026
Verdad Gallardo
Advanced
Joined: Nov 2006
Posts: 61
Likes: 0
From:
Wish I could be there in person and learn all this great engine building. Pictures are great, but to be there in person would be so awesome. Appreciate all the pictures and explanation. I wish that there was a class to learn how to do this!!!!

Intermediate
Joined: Sep 2007
Posts: 42
Likes: 0
From: DFW, TX
Mine is pretty dang fast (not as fast as yours but it holds its own)- Phil will vouch. Phil built my motor. As far as being Damn quick; it's just a matter of time. I'll be in a 124 or greater soon enough. Phil has been on me for a month to get er done. And, after talking to TR last week I am hooked.
I agree Chrome wont get ya home. But, it damn sure looks good on the side of the road if its busted. BTW a PhilM built motor is pretty damn reliable too - never a problem.
Now back to our regular scheduled program
and I guess I should apologize now for the spelling - naaaaaa
Last edited by CDP1911; Feb 7, 2010 at 02:01 AM. Reason: needed to