


iPod interface
The one thing that I did notice in the IPOD/Navigation Connector instructions was:
IN USE
the speaker selector switch should be in the "a" (illuminated) rearward position to hear navigation prompts over the vehicle speakers.
I think they are referring to the rocker switch on the lower dash. But I do not have one.
IN USE
the speaker selector switch should be in the "a" (illuminated) rearward position to hear navigation prompts over the vehicle speakers.
I think they are referring to the rocker switch on the lower dash. But I do not have one.
Steve
Cruiser

Joined: Aug 2009
Posts: 142
Likes: 14
From: Not here
First of all thanks for the quick reply. My instructions are Rev. 2010-09-14. I do have the Harley Zumo Road tech 660. I am using the "Y" cable. My handle bar mounting kit can with a 3.5mm male to male cable.
If you are confident that all of the connections are made to the right place...you need to make sure that they are all making a 'good' connection. Bent pins will kick your *** for several days...and please don't ask me how I know!
You also need to ensure that the settings on the Zumo are set correctly! I know it sounds silly...but check to make sure that the audio is turned up and is not muted.
I would also consider removing the 'Y' cable and simply make the connection from the NIM audio to the Zumo 'Audio-Out' connector and see if your symptoms change. We'll check the AUX input after we get it going the simplest way first.
I tested my system by turning on the radio first...and then turning on the Zumo...and then selecting a destination. Just seemed easier to me that way.
I've got to go offline in a few but will check back in the morning. PM me if you would like...and we'll get there!
Steve

Road Warrior
Joined: Jun 2006
Posts: 1,443
Likes: 3
From: Behind you
XM Radio, Pandora, Slacker Radio.

Stage I
Joined: Mar 2011
Posts: 1
Likes: 0
Great information and posts here. Wish I would have seen the one regarding getting those pesky pins in the radio harness. I tried first with needle nose pliers and pushing on the wire itself but started to break down the wire and chew up the insulation. I ended up using the small screwdriver approach and pushing way to hard for my liking (aka - a bit of a hammer approach) on the female side of the metal pin connector. It seemed to finally click in but is not entirely bottomed out in the harness (recessed about 1/8 inch as compared to the factory ones). The male side of the pins look to be about a 1/4 inch or so long so I am hoping this is still a solid enough connection. Everything works fine but I notice a minor buzz coming from the speakers when changing tracks, playlists, etc on the ipod. It seems to disappear when the music plays or maybe its just not distinguishable enough to notice. I have tried both hard drive and solid state drive ipods with the same buzz result. Anyone else notice the buzz when changing tracks? Could it be as a result of those recessed pins not making the "perfect" connection? I hate to mess with brutalizing the harness anymore than I have if this is just a normal condition.
Thanks for any assistance.
R
Thanks for any assistance.
R
Road Master


Joined: Mar 2009
Posts: 765
Likes: 49
From: New Jersey
First I would like to thank everyone here in this thread for all the infro. I just purchased my interface to find that it's on back order.
After getting the non-ultra harness and the tether this turned out to be one expensive upgrade, but I'm sure it will be worth it in the end.
After getting the non-ultra harness and the tether this turned out to be one expensive upgrade, but I'm sure it will be worth it in the end.
HD Forum Stories
The Best of Harley-Davidson for Lifelong Riders

Harley-Davidson Fat Boy Becomes a Dark, Decepticon-Inspired Custom
Verdad Gallardo
6 Weirdest Harley-Davidsons Ever Sold to the Public
Verdad Gallardo
7 Times Harley-Davidson Chucked Tradition Out the Window
Verdad Gallardo
7 Surprising Harley-Davidson Products that Are Not Motorcycles
Verdad Gallardo
8 Best Harley-Davidson Motorcycles Ever
Pouria Savadkouei
10 Worst Harley-Davidson Motorcycles Ever
Pouria Savadkouei
Killer Custom's Jail Break Is The Breakout That Refused to Blend In
Verdad Gallardo
Crazy Bunderbike Build Looks Amazing, But Is It Impossible to Ride?
Verdad Gallardo
Harley-Davidson Reveals Super Cool Cafe Racer Concept
Verdad GallardoOutstanding HDF Member
Joined: Jan 2011
Posts: 2,333
Likes: 77
From: Orlando, FL
I just installed my iPod Interface on my 2011 RGU today, wired per the 09/14/2010 revision instructions.....it works flawlessly, and the music quality is much better than when I had the iPod playing through the front AUX port with a mini-jack.
Couple of install notes:
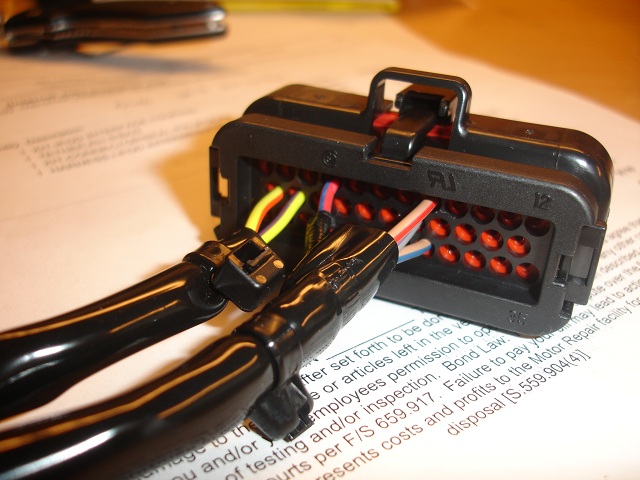
1) On the supplied iPod Y harness, at the end where the bare pin wires emerge from the black protective cover, cut the factory tyrap off and cut back the black protective covering approx. 2", to expose more of the colored wires. This will allow the wires to be integrated into the 35 pin AMP connector much easier, and without undue strain on this supplied iPod Y harness wires.
2) To correctly install the iPod Y harness pins into the 35 pin AMP connector, carefully remove the RED plastic 35-hole alignment block on the face of the AMP connector. This is easily done by carefully prying OUT each of the two very small black clips holding the RED alignment block on each side, while pulling the RED block straight out. This will allow the inserted pins from the iPod harness to click into the primary lock inside the 35 pin AMP connector. When done, carefully click the RED block back onto the AMP connector.
3) Try to route the Y harness wires into the 35 pin connector with some thought as to keeping the wires uniform to reduce strain.
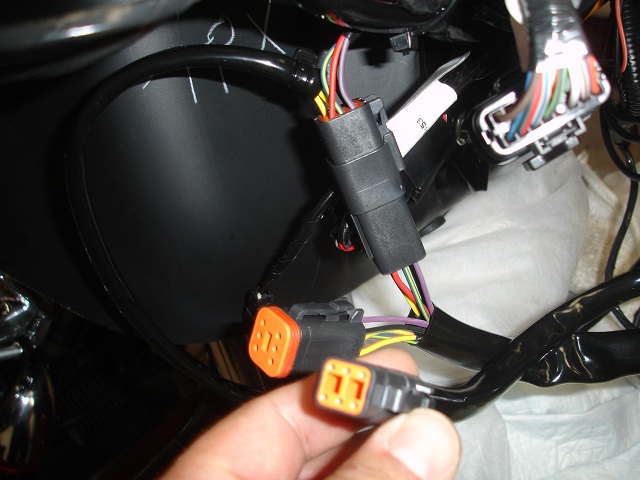
4)It may be confusing as to what they want you to do with the two (1 male / 1 female) 6 pin connectors on the Y harness. You need to search your existing motorcycle harness near the rear of the HK stereo, and find an already mated pair of identical connectors. Disconnect them, and "T" these iPod Y harness 6-pin connectors into the existing motorcycle harness.
5) The single larger connector is self explanitory, it connects to the iPod interface box you mounted on the top of the HK radio.
6) The strange (6 pin) smaller connector that remains after connecting everything is for the NAVIGATION unit that you can buy from HD. This will get capped and stowed if you don't have a Zumo GPS unit. If you do, this connects to the handlebar/dash interface for the Zumo.
7) The actual iPod interface cable that connects to the iPod is self explanitory. It plugs the round end into the iPod interface that you installed on top of the HK unit.
Couple of install notes:
1) On the supplied iPod Y harness, at the end where the bare pin wires emerge from the black protective cover, cut the factory tyrap off and cut back the black protective covering approx. 2", to expose more of the colored wires. This will allow the wires to be integrated into the 35 pin AMP connector much easier, and without undue strain on this supplied iPod Y harness wires.
2) To correctly install the iPod Y harness pins into the 35 pin AMP connector, carefully remove the RED plastic 35-hole alignment block on the face of the AMP connector. This is easily done by carefully prying OUT each of the two very small black clips holding the RED alignment block on each side, while pulling the RED block straight out. This will allow the inserted pins from the iPod harness to click into the primary lock inside the 35 pin AMP connector. When done, carefully click the RED block back onto the AMP connector.
3) Try to route the Y harness wires into the 35 pin connector with some thought as to keeping the wires uniform to reduce strain.
4)It may be confusing as to what they want you to do with the two (1 male / 1 female) 6 pin connectors on the Y harness. You need to search your existing motorcycle harness near the rear of the HK stereo, and find an already mated pair of identical connectors. Disconnect them, and "T" these iPod Y harness 6-pin connectors into the existing motorcycle harness.
5) The single larger connector is self explanitory, it connects to the iPod interface box you mounted on the top of the HK radio.
6) The strange (6 pin) smaller connector that remains after connecting everything is for the NAVIGATION unit that you can buy from HD. This will get capped and stowed if you don't have a Zumo GPS unit. If you do, this connects to the handlebar/dash interface for the Zumo.
7) The actual iPod interface cable that connects to the iPod is self explanitory. It plugs the round end into the iPod interface that you installed on top of the HK unit.
Xzotik, you will have a 6B (male) connector left over/unused from the NIM harness. What I was explaining in my earlier posts was that the instructions referring to the separation of connector 6 don't apply to FLHX, etc. since those bike's don't have an audio harness installed with a 6A connector connected to the 6B connector (thus creating the "connector 6").
So, on FLHX you simply use the 6A connector (female six wire connector) on the NIM harness to connect to the bike's 6B connector (male six wire connector), leaving an unused 6B (male) connector on the NIM harness.
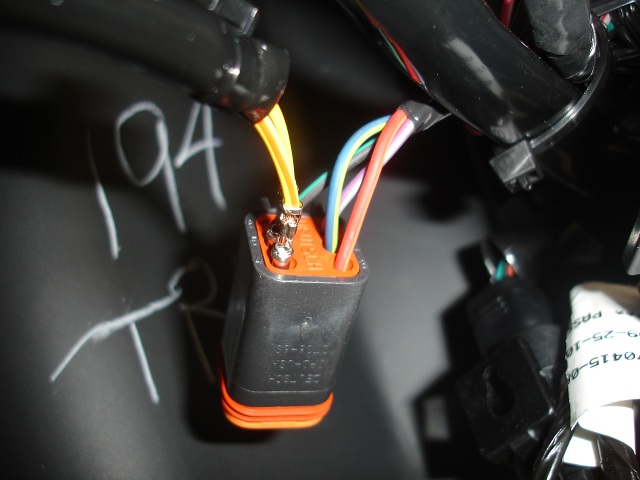
You'll know you have the bike's 6B connector by the wire colors. There will four wires in the six-wire connector: black/green, red/orange, blue/yellow, and violet/gray.
Good luck with your project.
Carl
So, on FLHX you simply use the 6A connector (female six wire connector) on the NIM harness to connect to the bike's 6B connector (male six wire connector), leaving an unused 6B (male) connector on the NIM harness.
You'll know you have the bike's 6B connector by the wire colors. There will four wires in the six-wire connector: black/green, red/orange, blue/yellow, and violet/gray.
Good luck with your project.
Carl
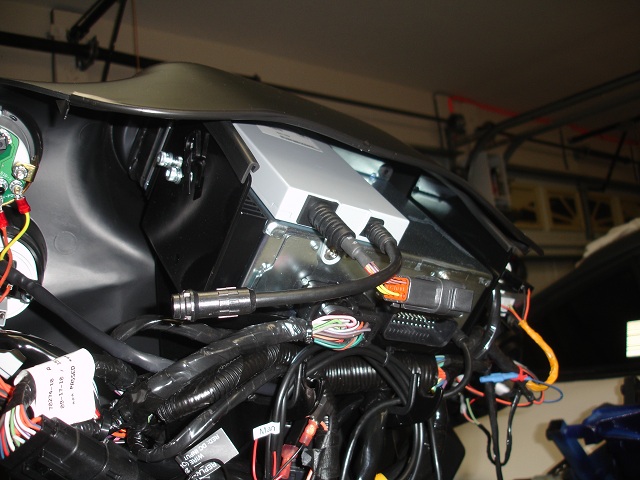
Interface installed on top of the radio:
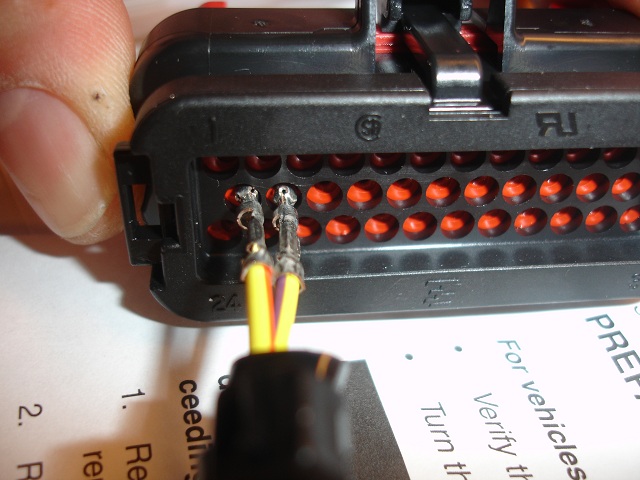
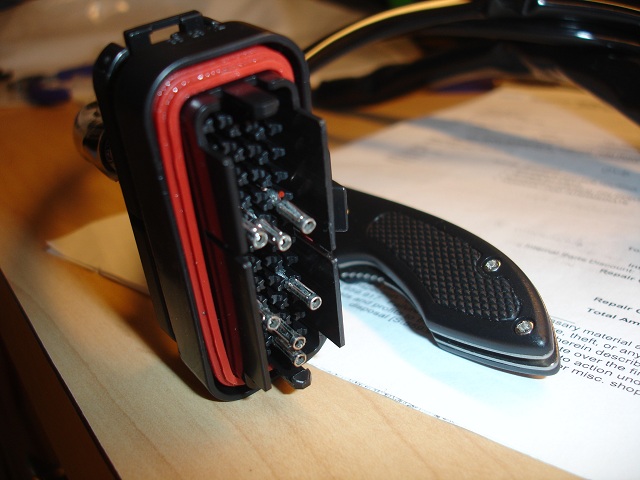
Inserting the pins in the 69200033 conector:

Harness in the motorcycle where the other end of the two wires go...

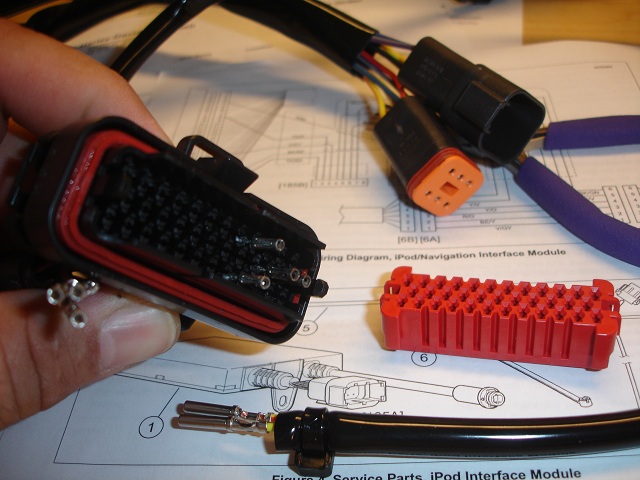
And, on the Road Glide Custom, the two plugs that stay disconnected... if you don't have navigation and not sure what else...
Last edited by wachuko; Mar 12, 2011 at 04:10 PM.
Extreme HDF Member
Joined: Apr 2006
Posts: 10,449
Likes: 46
From: Roswell, GA
You're welcome. With the quality of the pictures, you should start a thread titled something like "IPod Interface Installation using 69200033 Harness." I'm sure I haven't seen quality pictures showing the assembly of the wires in the two different connectors, or showing the unused connectors.
Nice job; but start a thread rather than essentially "burying" you excellent photos in this thread.
Carl
Nice job; but start a thread rather than essentially "burying" you excellent photos in this thread.
Carl