
Project FXDXT is underway
Novice
Joined: May 2008
Posts: 24
Likes: 0
From: Camarillo CA 60mi North of.L.A.on coast

The bike braked good with the Brembos on it. I am also happy with the HD 4 pot calipers with Lyndall Gold pads and a set of your HogPro/Lyndall lug rotors. A plus with the HD calipers are that they are rebuildable where the HD Brembos are not.
Here is a picture of the Brembo pads after I took them off. The arrow points to the ridge that was starting where the pads overhung the rotor.
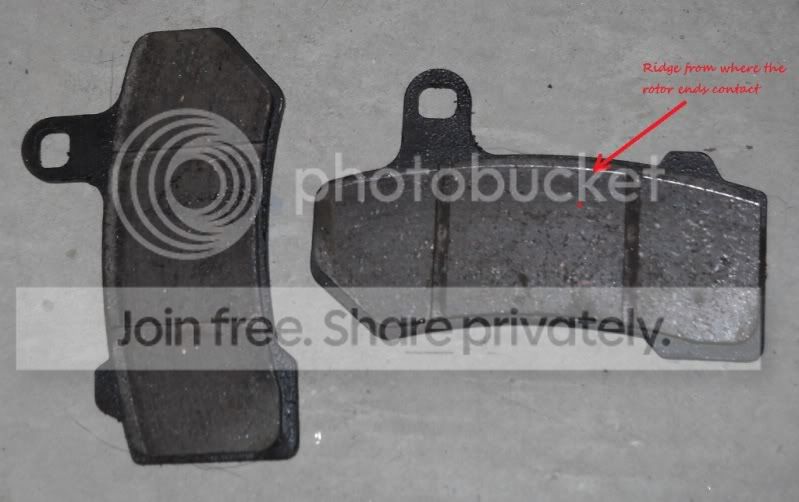
Here is a picture of the Brembo pads after I took them off. The arrow points to the ridge that was starting where the pads overhung the rotor.
I am reading through this post and have some insights that I would like to post. Thing is this post has turned into a BIG THRED with a life of its own so...Is I come up to something that I feel That I can contrbute to I will Quote it and give my observations...
The brembo breaks cannot be rebiult per say but there are seal kits that you can buy to replace all the seals. The olny thing you cant buy is the steel cups or "plungers" that push agansts the pads Those must be handeled carefully when rebiulding. you can get seals at
714-575-5000
Novice
Joined: May 2008
Posts: 24
Likes: 0
From: Camarillo CA 60mi North of.L.A.on coast
Yes we have updates. I got most of it done over the weekend, well actually all of it however the gas gauge gasket that I reused was already toasted and I had a bike of gas seeping out and all over the tank once I filled the bike all the way up so I am will pick up a new gasket today and that sorted and be good to go.
The weekend started bright and early with the install of the brake lines and checking the brembos to make sure that clearance for the calipers was good for the pads. I had shimmed the pads with a minuscule washer and they were too far to the left. So I took the shims off. I got some DOT 4 and bled the brakes with a brake bleeder. Once I removed the cardboard shim from the brake lever they bled nicely but it took me nearly an entire large bottle of fluid to get to that point. I had to laugh.

Next a good friend of mine showed up with the cam which had already had the bearings and cams pressed in with the inner chain installed as my press it at his for some reason. Thanks (you know who you are).

So we used the George's garage inner bearing puller and pulled the stock INA bearings out of the cam chest and pressed in some Torrington b-148's. Hit them with some assembly lube and they were good to go.
Next the cam plate (Screamin' Eagle Hydraulic with the bigger oil pump) was hit with assembly lube and slid on over the oil pump.

The oil pump was secured with the george's garage pins. Next I had to figure out which spacer to use for the top cam gear. After several tries I decided on the 347 spacer. The gears were installed with the dots so that they line up and the georges garage locking tool to hold them in place before torquing.

Once that part was done it was on the lifters which I had soaked in oil for several days. I dropped them in with the anti rotation pans. I then reinstalled the lifter blocks with new gaskets. The old gaskets were really cooked on there. Next was on to the pushrods and tubes. After disassembling and reassembling the tubes with the new tubes for the adjustable pushrods. As I tried to install the adjustable that I got off ebay I quickly discovered I got push rods for an evo. They were too long when adjusted as short as possible to fit in the lifter blocks. D'oh! Regardless of the fact that they were advertised for a twin cam I should have checked the part number before I got to this point. At least my local dealer (Bartels HD) was open and had what I needed in stock. A friend ran over there in his new GMC 53 low rider and grabbed them for me.

Once I got the pushrods adjusted and the tube clips installed you would think the bike would be ready to fire, but I had not gotten a chance to get the tins on yet although I had them all in hand. I decided to call it a day at this point as I had been out tinkering with the bike since 7am and it was well after 7PM.
I was up early on Sunday morning getting the tins ready to mount on the bike. I had to mount my Cee Bailey's windshield on the fairing, the fairing bracket on the fairing, get the gas gauge mounted on the tank along with the dash, The wiring harness and license plate mounted on tech rear fender along with the new lay down led tail light/turn signals. This was my exciting Saturday night so that I would be ready to go on Sunday morning.


I got everything done in my living room for the fairing as gas tank (which alter bit me in the ***) but that is a story for another posting.
Up early on Sunday I was out and mounting all the tins on the bike, double checking my work from the day before and finding a way to do something with the front turn signals which I can't stand. I settled on sticking them inside my fairing for now as that was a simple solution that took the least amount of time for now.
I poured some gas in the tank and crossed my fingers as I always do with a build like this. The battery was dead. D'oh! However I had another spare that I had charged up a few days before in anticipation of a battery going dead. So I got it in the bike and cranked it over a few times and fired to life! The Thunderheader has the deepest meanest sound, especially with a carburetor. There was plenty of clattering from the pushrods and lifters until the oil worked its way through the system. Once the oil had run its course it settled down and sounded perfect.

I cranked on the throttle a few times and that was it. I ran in the house to get my Helmet and boots and off I went. The bike only had 1 gallon of gas in it so I decided to stop and gas up on my way to search our some heim joints for my shifter linkage. I filled her up and turned back onto the street.
At this point I started to smell gas. As I glanced down at the tank I noticed that gas was seeping from under the dash all over my freshly painted tank. Crap! I hightailed it back to the gas station and hit the tank with a squeegee and some paper towels. Yeah I know they will both scratch my clear coat. So be it as I would rather have a few scratches than gas eating through my paint. I headed back home and drained the gas from the tank. OBviously the gasket the goes around the fuel gauge was shot and I should have replaced when warned that gas could seep if it was not replaced.
I just got off the phone with my dealer and they have it in stock along with the new screws that the manual recommends replacing every time. After this experience I will always replace this gasket.
So I had to ride one of my other bikes to work today and the FXDXT only got a good once over with wax on the gas tank on Monday. Regardless, I am really happy with the way the bike has turned out thus far.
I'll get some more pics with the good camera here at work tomorrow as you really can;t see the detail of the paint in these pics at all. It is black in the shade and sort of a a brownish with gold in the sun. there is still lots of stuff to do but it appears that the first round of mods is done.
The weekend started bright and early with the install of the brake lines and checking the brembos to make sure that clearance for the calipers was good for the pads. I had shimmed the pads with a minuscule washer and they were too far to the left. So I took the shims off. I got some DOT 4 and bled the brakes with a brake bleeder. Once I removed the cardboard shim from the brake lever they bled nicely but it took me nearly an entire large bottle of fluid to get to that point. I had to laugh.
Next a good friend of mine showed up with the cam which had already had the bearings and cams pressed in with the inner chain installed as my press it at his for some reason. Thanks (you know who you are).
So we used the George's garage inner bearing puller and pulled the stock INA bearings out of the cam chest and pressed in some Torrington b-148's. Hit them with some assembly lube and they were good to go.
Next the cam plate (Screamin' Eagle Hydraulic with the bigger oil pump) was hit with assembly lube and slid on over the oil pump.
The oil pump was secured with the george's garage pins. Next I had to figure out which spacer to use for the top cam gear. After several tries I decided on the 347 spacer. The gears were installed with the dots so that they line up and the georges garage locking tool to hold them in place before torquing.
Once that part was done it was on the lifters which I had soaked in oil for several days. I dropped them in with the anti rotation pans. I then reinstalled the lifter blocks with new gaskets. The old gaskets were really cooked on there. Next was on to the pushrods and tubes. After disassembling and reassembling the tubes with the new tubes for the adjustable pushrods. As I tried to install the adjustable that I got off ebay I quickly discovered I got push rods for an evo. They were too long when adjusted as short as possible to fit in the lifter blocks. D'oh! Regardless of the fact that they were advertised for a twin cam I should have checked the part number before I got to this point. At least my local dealer (Bartels HD) was open and had what I needed in stock. A friend ran over there in his new GMC 53 low rider and grabbed them for me.
Once I got the pushrods adjusted and the tube clips installed you would think the bike would be ready to fire, but I had not gotten a chance to get the tins on yet although I had them all in hand. I decided to call it a day at this point as I had been out tinkering with the bike since 7am and it was well after 7PM.
I was up early on Sunday morning getting the tins ready to mount on the bike. I had to mount my Cee Bailey's windshield on the fairing, the fairing bracket on the fairing, get the gas gauge mounted on the tank along with the dash, The wiring harness and license plate mounted on tech rear fender along with the new lay down led tail light/turn signals. This was my exciting Saturday night so that I would be ready to go on Sunday morning.
I got everything done in my living room for the fairing as gas tank (which alter bit me in the ***) but that is a story for another posting.
Up early on Sunday I was out and mounting all the tins on the bike, double checking my work from the day before and finding a way to do something with the front turn signals which I can't stand. I settled on sticking them inside my fairing for now as that was a simple solution that took the least amount of time for now.
I poured some gas in the tank and crossed my fingers as I always do with a build like this. The battery was dead. D'oh! However I had another spare that I had charged up a few days before in anticipation of a battery going dead. So I got it in the bike and cranked it over a few times and fired to life! The Thunderheader has the deepest meanest sound, especially with a carburetor. There was plenty of clattering from the pushrods and lifters until the oil worked its way through the system. Once the oil had run its course it settled down and sounded perfect.
I cranked on the throttle a few times and that was it. I ran in the house to get my Helmet and boots and off I went. The bike only had 1 gallon of gas in it so I decided to stop and gas up on my way to search our some heim joints for my shifter linkage. I filled her up and turned back onto the street.
At this point I started to smell gas. As I glanced down at the tank I noticed that gas was seeping from under the dash all over my freshly painted tank. Crap! I hightailed it back to the gas station and hit the tank with a squeegee and some paper towels. Yeah I know they will both scratch my clear coat. So be it as I would rather have a few scratches than gas eating through my paint. I headed back home and drained the gas from the tank. OBviously the gasket the goes around the fuel gauge was shot and I should have replaced when warned that gas could seep if it was not replaced.
I just got off the phone with my dealer and they have it in stock along with the new screws that the manual recommends replacing every time. After this experience I will always replace this gasket.
So I had to ride one of my other bikes to work today and the FXDXT only got a good once over with wax on the gas tank on Monday. Regardless, I am really happy with the way the bike has turned out thus far.
I'll get some more pics with the good camera here at work tomorrow as you really can;t see the detail of the paint in these pics at all. It is black in the shade and sort of a a brownish with gold in the sun. there is still lots of stuff to do but it appears that the first round of mods is done.
Novice
Joined: May 2008
Posts: 24
Likes: 0
From: Camarillo CA 60mi North of.L.A.on coast
http://www.por15.com/High-Temperatur...ts/products/8/
Last edited by 2wheelrider; Dec 1, 2012 at 02:00 PM.

Thread Starter
|
Former Sponsor
Joined: Aug 2005
Posts: 10,968
Likes: 54
That was a really old pic. I got that all sorted with a new gasket long ago. I didn't replace the screws and all has been fine for a long time. Thanks regardless.
HD Forum Stories
The Best of Harley-Davidson for Lifelong Riders

7 Surprising Harley-Davidson Products that Are Not Motorcycles
Verdad Gallardo
8 Best Harley-Davidson Motorcycles Ever
Pouria Savadkouei
10 Worst Harley-Davidson Motorcycles Ever
Pouria Savadkouei
Killer Custom's Jail Break Is The Breakout That Refused to Blend In
Verdad Gallardo
Crazy Bunderbike Build Looks Amazing, But Is It Impossible to Ride?
Verdad Gallardo
Harley-Davidson Reveals Super Cool Cafe Racer Concept
Verdad Gallardo
Engraved Rebellion: Inside Bundnerbike's Glam Rock II
Verdad Gallardo
10 Motorcycles You Should Never Buy
Joe Kucinski