


DIY Cheap Mods

Intermediate
Joined: Sep 2009
Posts: 26
Likes: 0
From: Middle TN
I am not sure if this is the right place to ask, I am a new guy so go easy on me. I really like the way that the Heartland kit looks on a softail but refuse to believe that I need to spend $1999 on a fender and struts. NO offense to Heartland I am sure they have great stuff I just dont have that kinda cash. There has to someone out there who has used a blank fender cut it up and rattle canned it to acheive the same look. I have seen all the other good ideas on this thread just wondering if you guys have any ideas or maybe someone has already done this. I cant believe that I am the only one that thinks the heartland kit is too pricey. By the way this is the best thread on this site, keep the good ideas coming!!!!
Tourer
Joined: Sep 2009
Posts: 309
Likes: 2
From: Tegucigalpa
I have a 1995 fatboy and love the looks with a solo seat but would be better if u could get rid of the license plate to have a smooth rear fender right? there's a cheap if not free way to do it.
U first remove the license and it's mount from the fender, pull it apart and u end up with a two piece mounting hardware. This is simple, all u need is a dremel tool and a cut-off wheel for steel. The smaller piece of the hardware has a base where 3 screws go and are attached to the fender, u gotta get rid of this part by cutting it off exxactly atthe curve. now u should have the upper part of the bracket with one hole at the top where another screw goes. With a hammer u have to flatten out the lower part from where u cut the extra material (flatten out because it is round to contour the fender) after doing that u just bend the piece to a 90� angle and ur done with that piece.
The second piece,the one where the license directly attaches has a straight metal piece at theupper part, watched from front, it makes like an inverted "T" u have to cut the "stick" ofthe "T" (the stick, where there's just one hole fora screw that held it to the first piece) u cut it as far in as possible and straighten with the hammer any curved surface. After having both pieces cut, u measure one on top of the other to drill a hole into them and be able to attach them together. The place to drill the hole in the first piece is the place u flattened out, and in the second piece,it's the flat part near the "stick" u just cut. After drilling and screwing both parts together (uses the same screws from the mounting hardware) u now have to unscrew the one of the nuts of the chrome belt guard (the upper one closes to the end of the bike, loacted near the swing arm) and screw the new mount on it through the hole left in the 90� in the first piece (u mayhave to drill a bit tomake it wider to fit the screw) and there u have it, a relocated mount to the left side ofthe bike with $0 invested... so far...
to cover the remaining holes in the fender, I bought a set of "skull license plate bolts" from H-D and they fit in nicely, u can do whatever u want in that part.
Hope u enjoy,I'll try to get pics as soon as possible,I have to simount it to paint it a little.
any questions about it PM me,I'll the pics uploaded in the next couple of days on how the pieces should look and the finished product should look also.
cheers
Last edited by In Memoriam Citoriplus; Sep 10, 2009 at 06:25 AM.
6th Gear
Joined: Aug 2009
Posts: 11
Likes: 0
From: Australia
Seeing as I got all the heritage stuff with the bike when I bought it & have been spending money on other stuff I got to thinking how I could carry stuff & use what I had laying about, & as I only ride solo because it's the only way you can do what you like when you want, I was going to put a rack of some sort on before the bike gets painted any way, & I had a vetura bag I used on my old GPZ11, so I just cut the brackets on the pillion back rest & drilled a couple of extra holes, got a mate to sand blast the chrome off & painted em with VHT gloss black caliper paint, I put 4 of 1 1/2 X 3/8 S/Steel bolts through the struts whith the domed nuts I already had & the bag slips over the back rest & sits on the rack just nice & I now can sit back & tack it easy & carry wet weather pants, tools, med kit, beer & the other **** you end up needing. total cost about $20 for paint & bolts.
6th Gear
Joined: Aug 2009
Posts: 11
Likes: 0
From: Australia
I have never been a fan of tasles or conchos & neather was the dude I bought my bike off as the skirt on the seat just had the holes where he took the chonchos off, I bought a couple of badges off ebay & cut out two discs out of a bit of aluminium about 1/8" thick with a hole saw, I then filed around the edge, then polished them with the drill with polish wheels I bought in a kit, that I used to polish my fatboy wheels when I got them, a hard wheel and a soft wheel 2 different sizes and 2 different compounds, I drilled 2 holes in them then through the seat skirt, I put self tappers through from the back of the skirt into the aluminium discs then cut off the excess part of the screws with one of those fine cut off discs in the 4" grinder, cleaned off the polish with some MEK where the badge was going to stick onto then stuck them on, what do you think?
Thread Starter
|
May our Moderator Rest in Peace
Joined: Sep 2006
Posts: 11,386
Likes: 35
From: Rochester, NY
jonesboy1,
Very good ideas, well exicuted. I might have used a rectangular aluminum plate instead of the washers. That way you could have put some kind of sealing/glue compound between it and the leather to seal up that slotted hole, make it a but more water repelent, and give the badge a bit more support.
But that aside, its a really good idea I'm going to have to remember If I manage to find a cheap set of bags that happen to have them.
Novice
Joined: Mar 2008
Posts: 19
Likes: 0
From: Vancouver Wa
Just moved the front turn signals from bars to forks on my '04 FATBOY. Super easy and cheap if you use stock signals.
- signals are 5/16 x 24 thread
- forks are threaded for same
- stainless all thread cut to length.... couple stainless nuts and some washers
- cut the plug off
- solder all connections back together then heat shrink over the splice
Boom!!!
The key is to thread the allthread into the forks. Add washers and 2 nuts. Tighten the inside nut to the forks holding down anything you may have, I have a windshield. Measure thread depth in the signal, less 1/16 - 1/8" and cut allthread. Thread on signal and tighten in place with out side nut. LOCTITE ALL AROUND FOLKS. Have to move the tank to handle the electrical and viola... relocation for about $20.
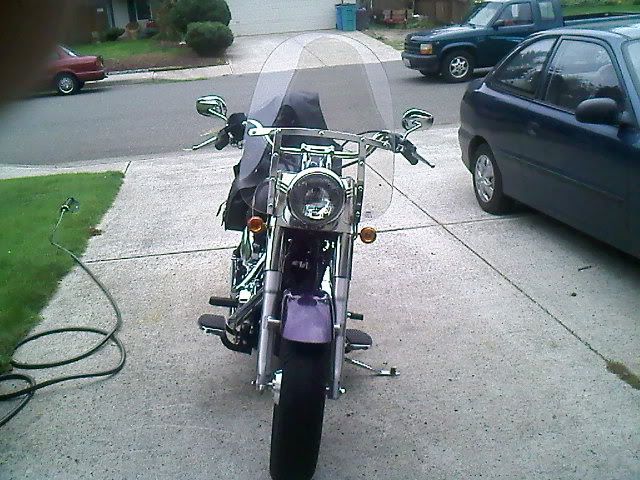


Getting some photos ready. Putting another kit together for a riding friend. Here is a close up rear shot

- signals are 5/16 x 24 thread
- forks are threaded for same
- stainless all thread cut to length.... couple stainless nuts and some washers
- cut the plug off
- solder all connections back together then heat shrink over the splice
Boom!!!
The key is to thread the allthread into the forks. Add washers and 2 nuts. Tighten the inside nut to the forks holding down anything you may have, I have a windshield. Measure thread depth in the signal, less 1/16 - 1/8" and cut allthread. Thread on signal and tighten in place with out side nut. LOCTITE ALL AROUND FOLKS. Have to move the tank to handle the electrical and viola... relocation for about $20.
Getting some photos ready. Putting another kit together for a riding friend. Here is a close up rear shot
Last edited by coatit; Oct 2, 2009 at 06:08 PM.
Thread Starter
|
May our Moderator Rest in Peace
Joined: Sep 2006
Posts: 11,386
Likes: 35
From: Rochester, NY
Forget the PM thing and just get the pics and edit the post to add them in.
That way you don't have to answer PM's about it 6 or 8 months later when someone discovers this.
I love cheap 'fix's', thanks for contributing.
Frank
That way you don't have to answer PM's about it 6 or 8 months later when someone discovers this.
I love cheap 'fix's', thanks for contributing.
Frank
HD Forum Stories
The Best of Harley-Davidson for Lifelong Riders

8 Best Harley-Davidson Motorcycles Ever
Pouria Savadkouei
10 Worst Harley-Davidson Motorcycles Ever
Pouria Savadkouei
Killer Custom's Jail Break Is The Breakout That Refused to Blend In
Verdad Gallardo
Crazy Bunderbike Build Looks Amazing, But Is It Impossible to Ride?
Verdad Gallardo
Harley-Davidson Reveals Super Cool Cafe Racer Concept
Verdad Gallardo
Engraved Rebellion: Inside Bundnerbike's Glam Rock II
Verdad Gallardo
10 Motorcycles You Should Never Buy
Joe Kucinski
10 Things Harley-Davidson Needs to Fix in 2026
Verdad Gallardo
Southpaw Super Glide: A Left-Hand-Drive 1979 Harley FXE Built to Fit the Rider
Verdad GallardoThread Starter
|
May our Moderator Rest in Peace
Joined: Sep 2006
Posts: 11,386
Likes: 35
From: Rochester, NY
Here�s a tip for any of you guy�s who haven�t had any kind of formal shop training, but would like to try making things for themselves.
A bench vise is one of the tools that is one of those must have tools for any kind of metal work. But even the cheap ones have a hardened tool steel insert with diamond cut teeth (knurled) for the gripping part of the jaws. These �teeth� make gripping metal much easier and safer, but will often leave a distinctive and hard to remove �tool� mark on anything they grip. The marks can be a real pain in the butt to grind, file or, polish off but can be easily avoided by the simple expedient of making a set of cheap inserts out of thin aluminum (1/8� is good) sheet.
You need to cut two pieces about 2 or 3� (or longer for a really big vise) and about 1� wider than the jaws. Put both pieces in the vise making sure the plates extend slightly below the bottom and out both sides of the gripping surface of the jaws. The idea is to completely cover the vises jaw teeth.
Next, use a hacksaw to make a cut sideways in the plates level with the top edge of the jaws. You can use a file if you like to cut a �V� into that part. But it�s not really necessary. We�re not interested in looks as much as function here.
Next is to use a wedge or big screwdriver to separate the plates and bend them away from each other to into �V� shapes so you can use your favorite ball peen hammer to form the aluminum plates to fit the ends and top contour of the vise.
It doesn�t have to be perfect, close is more than adequate. So just beat on the plates until you square it off with the top and sides of the jaw face and make it curve down the sides. That will help keep them in place but still allow you too quickly and easily remove or replace them as needed.
Now you have a set of softer inserts that will let you really crank down on the vise without fear of putting teeth marks on raw material or in many cases damaging a finish that might already be on the part.
Just one thing, if you do a lot of cutting and filing with them installed you want to wipe the inner facing parts off when you are done and make new ones every so often. How often is gong to be up to you. But if you drill, file, or use a hacksaw on some steel then the next time you use them its on some piece of aluminum or other soft material its very easy to �press� any left over steel filings into the softer material.
It won�t be a big deal today, but a couple of years down the road you�ll be scratching your head wondering why the neat aluminum piece you made looks like it has specks of rust on it.
Road Captain
Joined: Jul 2008
Posts: 532
Likes: 15
From: Shelton, WA
+1....I want to move my signals off the bars and would love to see close ups of a clean mod. I've seen some that look homemade. I know they are, but I think it can be done to look good as well as function.